Last updated: October 4, 2026
This document is a reference manual for accolva, a browser-based band score editor. It documents each screen element and feature with screenshots.
accolva runs entirely in the browser. There is nothing to install, and you can try it without signing in.
1. Three Screens
accolva has three screens, and you move between them in this order.
| Screen | What it is for |
|---|---|
| Song list | Your songs and your bands’ songs. Create a new song |
| Song page | Read the score, play it, share it, print it |
| Editor | Write the score. The score is on the left, the input panel on the right and bottom |
Every screen has a bar at the top: logo, print, MIDI, notifications, feedback, About accolva, language switch, and your account.
2. Getting Started
2.1 Try it without signing in
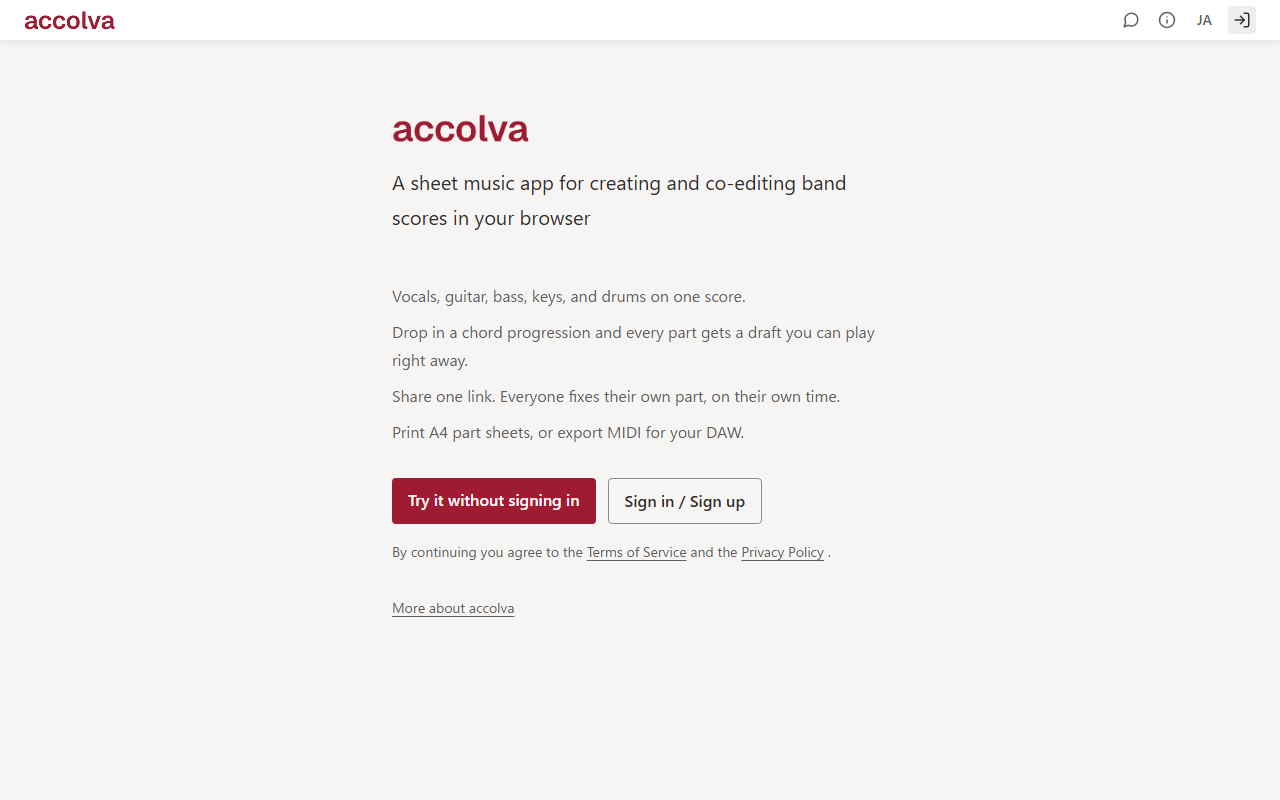
Press “Try it without signing in” on the front page and you can start writing right away. What you write stays on your device (in your browser). Press “Save this song” in the bar and, once you sign in, everything you have written so far becomes a new song of your own.
On your first visit only, accolva asks “Where would you like to start?“: start with a blank score, or load a MIDI or MusicXML file you already have (see “2.4 Importing from a file”). Closing the dialog starts you on the blank score. It does not appear again — after that, you pick up where you left off.
2.2 Signing in, and bands
Sign in with an email address and password, or with a Google account.
A song lives either in “My songs” or in a band, and every member of a band can edit the songs kept there. Create a band with “New band” on the left of the song list. Select a band and open “Members and invites” to do the following.
| Item | What it does |
|---|---|
| Members | Everyone in the band. The owner is marked |
| Your display name | Used across all your bands. It appears on comments and on “Last change” |
| Invite | “Create an invite link” issues a link. Anyone who has it can join. It expires in 14 days |
| Band settings | Rename the band, hand it over, or delete it (owner only). Deleting a band does not delete songs — they go back to their own owners |
2.3 The song list
The “Places” sidebar switches between My songs and your bands. At the top right are a title search and a sort order (recently updated / by name).
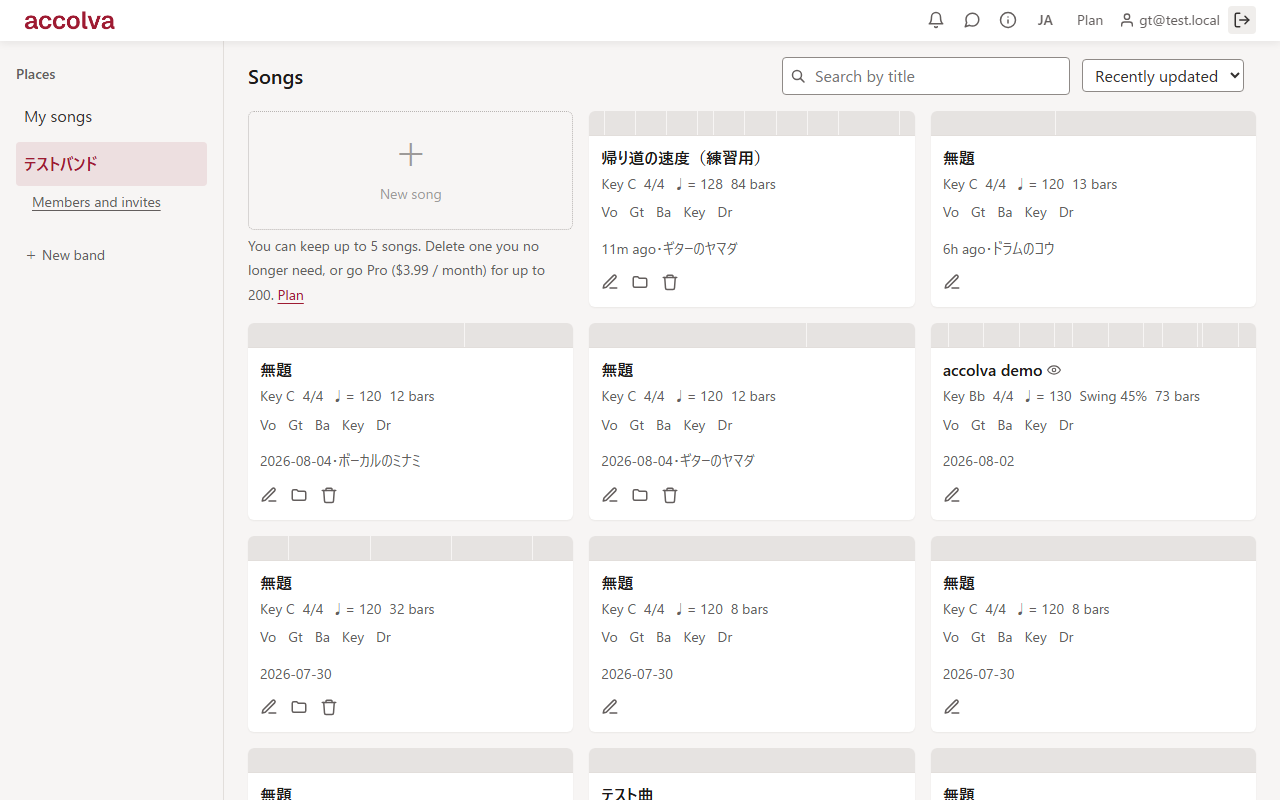
The strip along the top of a card is a preview of the structure, and its blocks are sized in proportion to the bar count — so a short intro and a long final chorus look the way they sound. Below that are the title, key, time signature, tempo, feel, bar count, part abbreviations and the last change.
The icons at the bottom of a card are, from left, pencil (Edit) / folder (Where this song lives) / trash (Delete this song); the last two only appear for the song’s owner. On your own cards, a right-click is a shortcut to the same folder dialog.
“New song” creates a song. There is a limit on how many songs you can keep (see “17. Song limit”). Next to it, “Import from file” builds a song out of a file you already have.
2.4 Importing from a file
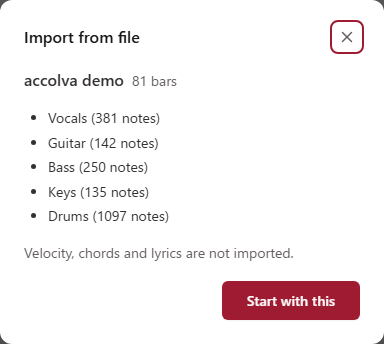
“Import from file” reads MIDI (.mid, .midi) and MusicXML (.musicxml, .xml, .mxl). The file is read entirely inside your browser — the file itself is never sent to the server.
Once it is read, a confirmation dialog comes before the song is created.
| What it shows | Meaning |
|---|---|
| Bars | How long the imported song will be |
| Parts and notes | Which staves will be created, and with how many notes |
| Quantized | How many notes will be moved or resized so they can be written |
| Not imported | Notes that cannot be written, drum hits with no matching drum, any second lyric line, tempo changes mid-song, and anything past 300 bars |
Press “Create song” and it becomes a new song (which counts toward your song limit). “Choose another file” lets you pick again.
Some things are not carried over. Velocity never is, and from MIDI neither are chords or lyrics. MusicXML brings chords, lyrics, repeat marks, grand staves and pickup bars, but not pedal marks and some other performance marks.
- MIDI is a recording of a performance, so note positions and lengths are rounded to what can be written (down to sixteenths and sixteenth triplets). MusicXML already contains notation, so note values are read as written
- Parts are sorted into vocal / guitar / bass / keys / drums from the instrument (the GM program number). Anything that fits none of them becomes keys. You can change it afterwards (see “9. Manage Parts”)
- Tempo, time signature and key are read from the first part. Tempo changes mid-song are not imported (a song has one tempo)
- Files can be up to 8 MB. MIDI format 2, SMPTE and score-timewise are not supported
3. The Song Page
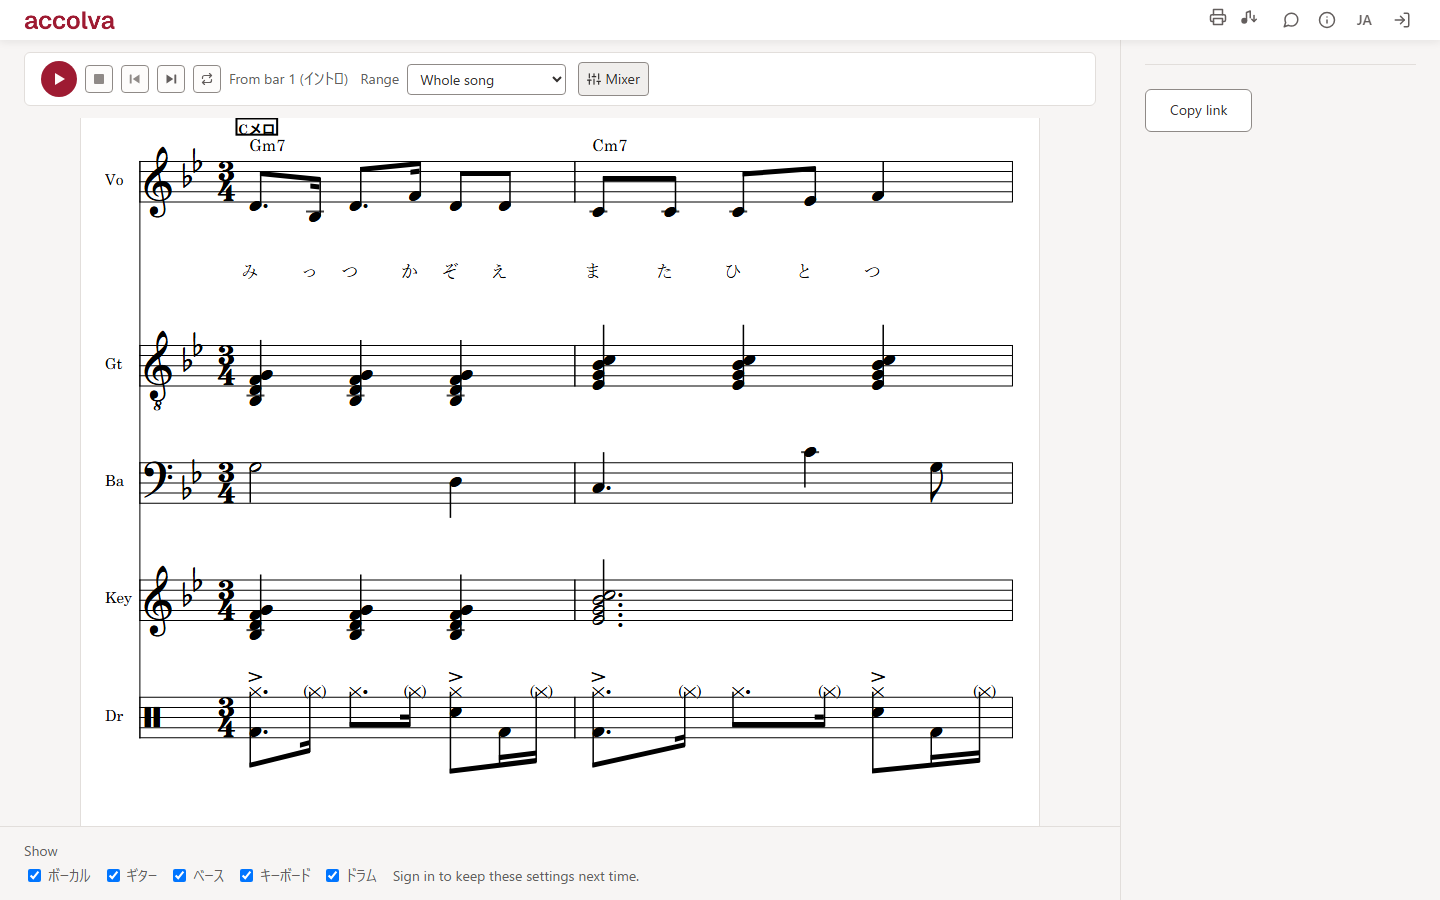
Clicking a title opens the song page — the screen for reading a score, playing it, and handing it to someone.
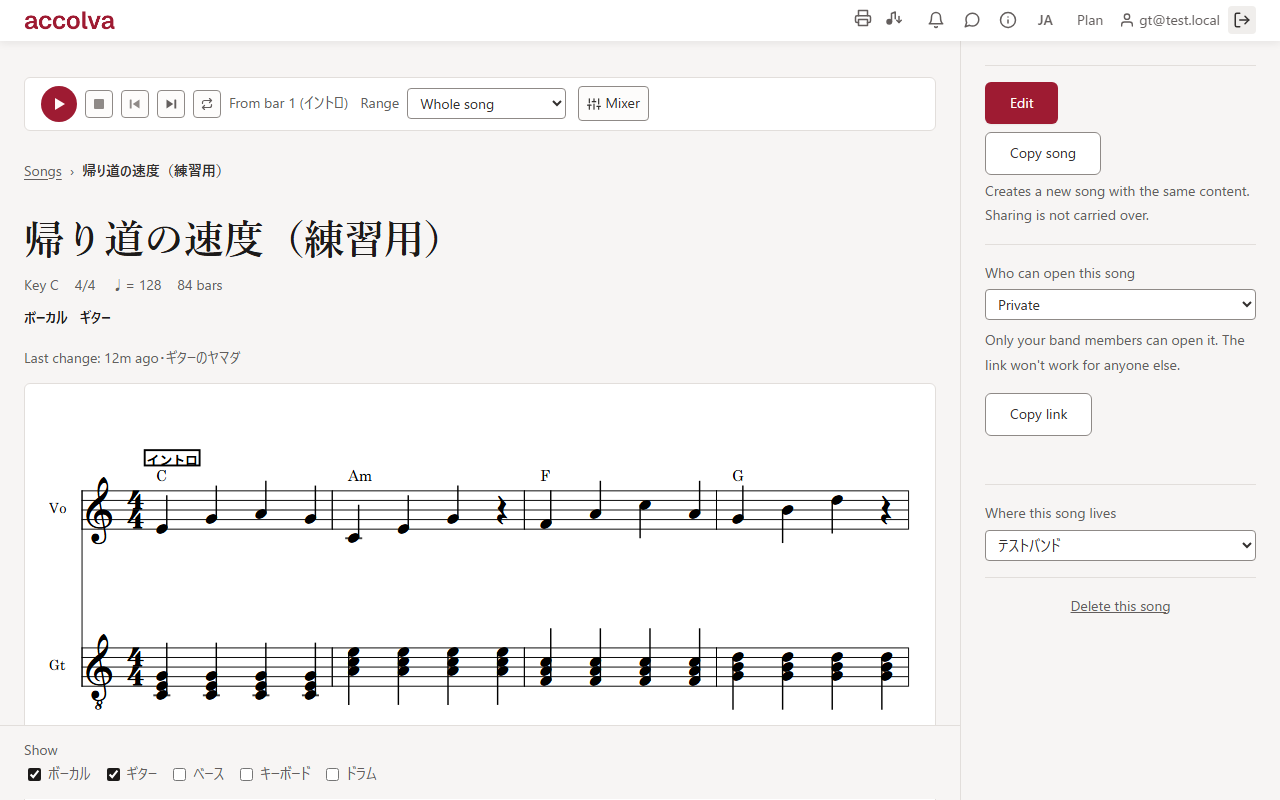
- Playback bar: play, stop, previous/next bar, loop, range to play, mixer (see “12. Playing the song”)
- Score: all parts on one score. “Show” at the bottom picks which parts are laid out, as chips. This is a per-person setting and, if you are signed in, it is remembered next time
- Zoom: the −, %, + under the score change how large the paper is (below)
- Right column: what to do with this song
| Item | What it does |
|---|---|
| Edit | Go to the editor |
| Copy song | Create a new song with the same content. Sharing is not carried over (the copy starts Private). Comments, view settings and notifications do not come along |
| Who can open this song | Private / Anyone with the link can view and comment / Anyone with the link can edit (see “13.4 Sharing”) |
| Copy link | Copy this song’s URL |
| Where this song lives | My songs ↔ any band you belong to (owner only) |
| Delete this song | Asks you to type the title to confirm. The song leaves the list and other members can no longer see it, but the owner can restore it from this page (owner only) |
Score zoom steps through 50 / 67 / 80 / 100 / 125 / 150 / 200 / 250 / 300%. Zooming in makes the notation larger and fits fewer bars per line. Pressing the percentage resets it to 100%. The level is remembered per device — it is not part of the song, so nobody else’s screen changes.
- How far you can zoom in depends on the song. The limit is the point where its densest bar still fits on the page; past that the + is disabled and says why. Showing fewer parts raises the limit
- The same zoom is in the editor, and one level applies to both. It does not appear on phones (handheld screens keep the one-bar-per-line, actual-size view)
4. The Editor
Pressing “Edit” opens the editor.
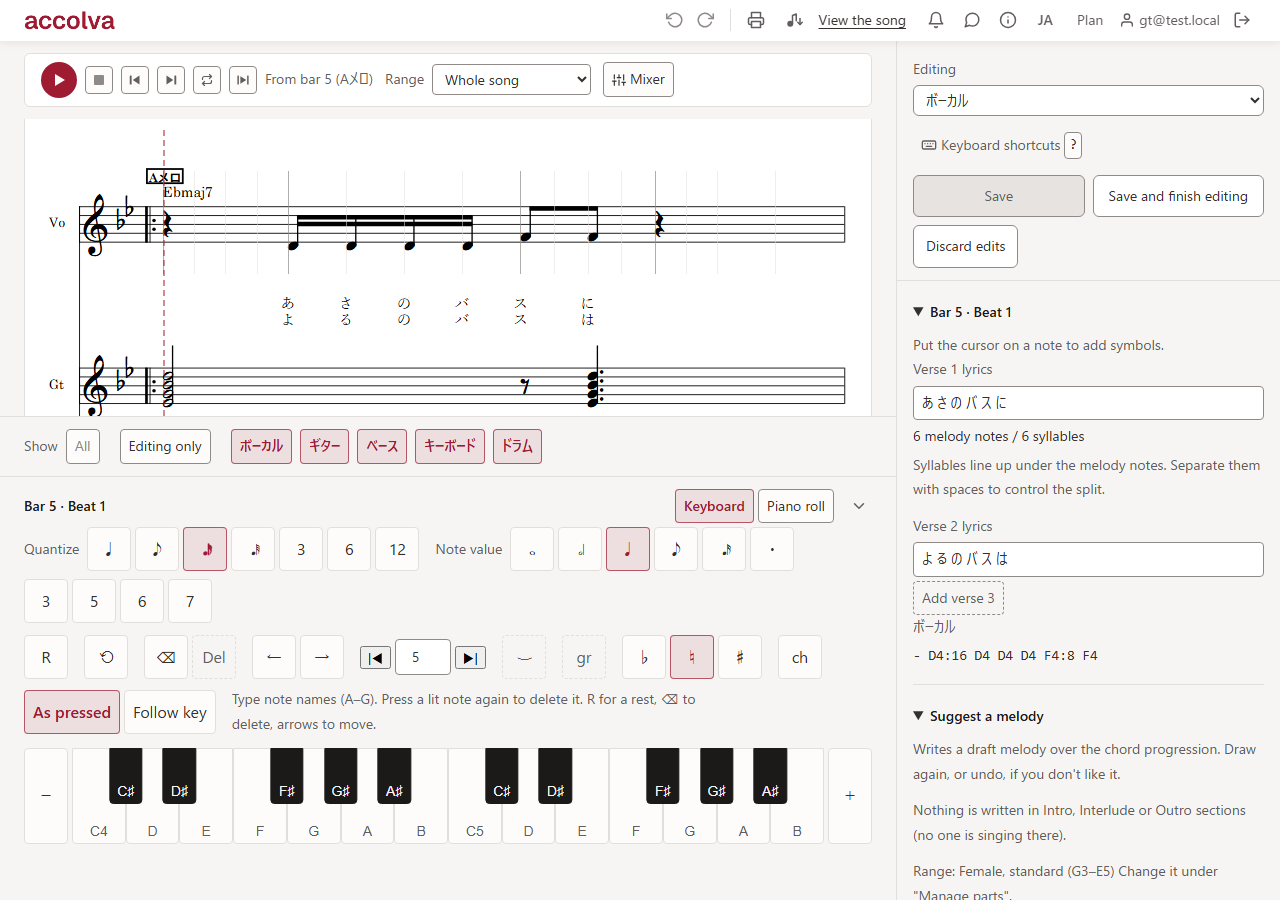
- Playback bar (top): the same one as on the song page — you can play while you write
- Score (left): all parts laid out in parallel. Click to put the cursor there
- Show row (under the score): “All”, “Editing only”, and one chip per part. You choose which staves are laid out (the one you are editing, and the last remaining one, cannot be removed). Zoom sits at the right end (see “3. The Song Page”)
- Input panel (right): what you are editing, the save controls, the fields for the current bar, and comments
- Input pad (bottom): the tool you place notes with. It mirrors the bar the cursor is in
Drag the borders to change the panel’s width and the pad’s height. Each border carries a visible handle, and once you grab one the arrow keys move it too. Double-click returns it to the default.
5. What You Are Editing, and Editing Sessions
5.1 The “Editing” selector
At the top of the panel, “Editing” picks the one thing you are touching. The options come in two groups.
| Group | Targets |
|---|---|
| Whole song | Song settings / Structure / Chords / Manage parts / Create the backing |
| Each part | Vocal / Guitar / Bass / Keys / Drums (whichever parts the song has) |
5.2 Editing sessions
Press “Start editing” and a session begins: the panel turns from a read-only summary into input fields. Double-clicking the score starts a session too, on the part of the row you clicked and at that bar (a single click only moves the cursor). During a session three buttons appear.
| Button | What it does |
|---|---|
| Save | Save and keep editing |
| Save and finish editing | Save and end the session |
| Discard edits | Throw away unsaved changes and end the session |
Saving happens per target. That is what lets two people work on the same song at the same time, on different parts.
Locks are held per bar. What you hold is the bar the cursor is in, any bar you have not saved yet, and the range you are about to fill — there is nothing to claim or release by hand. Two people can write in the same guitar part at the same time, as long as one is in bars 1–8 and the other in bars 9–16.
Bars someone else holds are drawn on the score as a rectangle over that row and those bars, labelled ”Name is editing target (bars N–M)“. The lock is released when you finish, and it expires on its own about 90 seconds after you leave the page. “Structure” is the exception — it moves bar numbers, so starting a structure session locks the whole song.
When you fill in chords, a melody or an accompaniment in bulk, you are told before it runs if the range overlaps what someone else is holding.
If someone else changed the same range while you were writing, the save is refused and a warning appears (reload, then re-apply your change). That check is per bar as well, so two people writing in different bars of the same part never collide.
6. Song Settings
Editing target “Song settings”: title, tempo, key and feel.
| Item | What it does |
|---|---|
| Title | Printed as the heading of the score |
| Tempo | Quarter-note BPM |
| Key | C, G, D, A, E, B, F#, F, B♭, E♭, A♭, D♭ |
| Feel | Straight / Eighth swing / Sixteenth swing. It is printed on the page as “Swing” |
| Swing (%) | 0% is straight, 100% is triplet (2:1). Shown only when a swing feel is set; a number is printed when it is not the default |
Time signatures are a per-bar thing, so they are set under “Structure” at the bar level rather than here (see “7.2 Bars”).
7. Structure
Editing target “Structure”. The list of sections is the length of the song.
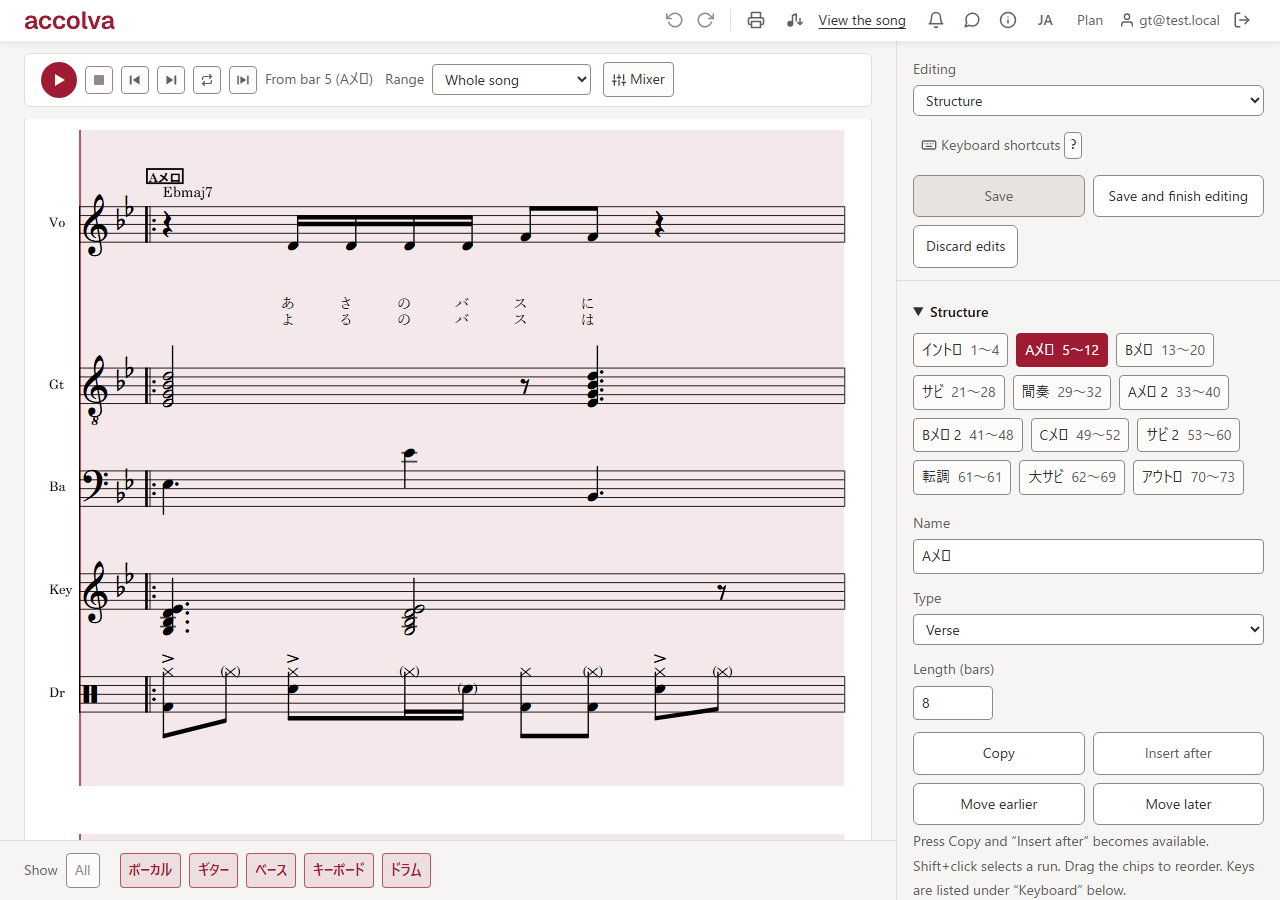
7.1 Sections
The section chips are at the top of the panel. Press one to select it; the matching range is banded on the score.
| Item | What it does |
|---|---|
| Label | The name shown on screen and on paper (free text) |
| Kind | Intro / Verse / Pre-chorus / Chorus / Bridge / Interlude / Outro. It also sets how thick the auto-fill draft is |
| Length (bars) | How many bars the section takes. Growing adds bars; shrinking removes the trailing bars along with their contents |
| Copy / Insert after | “Copy” takes a clipping; “Insert after” adds it — bars and all — right after the selection (it never overwrites) |
| Move earlier / Move later | Reorder |
| Add section / Delete this section | Add goes right after the selection (4 bars by default). Delete removes the bars too |
Shift+click selects a run of sections. The section bands on the score can be dragged to reorder.
7.2 Bars
Press a bar number inside a section to descend to the bar level.
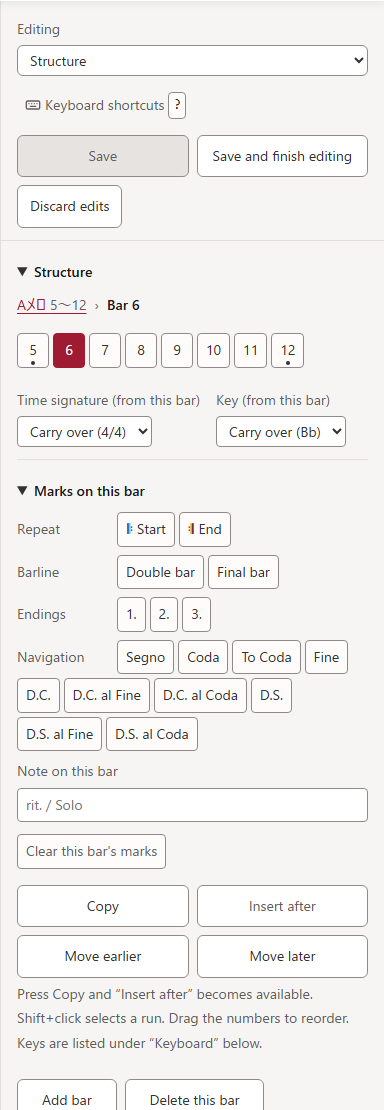
| Item | What it does |
|---|---|
| Time signature (from this bar) | Carry over / 2/4 / 3/4 / 4/4 / 5/4 / 6/8 / 7/8 / 9/8 / 12/8 |
| Key (from this bar) | Carry over / any of the 12 keys. This is how you write a key change mid-song |
| Repeat | 𝄆 Start / 𝄇 End |
| Barline | Double bar / Final bar |
| Endings | 1. / 2. / 3. |
| Navigation | Segno / Coda / To Coda / Fine / D.C. / D.C. al Fine / D.C. al Coda / D.S. / D.S. al Fine / D.S. al Coda |
| Note on this bar | Free text above the bar (e.g. rit. / Solo) |
| Clear this bar’s marks | Remove all of the above |
Bars also have Copy / Insert after / Move earlier / Move later / Add bar / Delete this bar. Under the panel you see “N bars · M bars left” (one song holds up to 300 bars).
The signs are drawn as-is on paper, and playback and MIDI export follow the same rule to unfold them — the reader and the machine take the same route.
7.3 Song form
Open “Song form” to pick a common shape and replace the whole structure: One chorus (Verse–Chorus) / AABA (32 bars) / Verse–Chorus / Rock (solo in the interlude) / J-POP (Verse–Pre-chorus–Chorus). Bar numbers do not move, so anything already written stays in the same bars.
8. Chords
Editing target “Chords”. Chords feed every part — both the auto-fill draft and the melody suggestion read them.
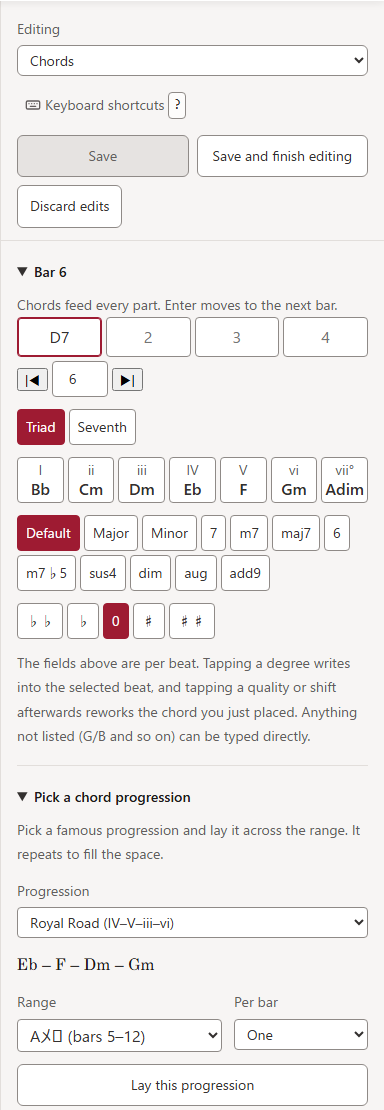
8.1 Tap to choose
The fields at the top are per beat, and what you tap is written into the selected beat. Enter moves to the next bar.
- Pick “Triad” or “Seventh”
- Tap one of the diatonic degrees (I–VII) for the current key; it is written into the selected beat
- Then tap “Default / Major / Minor / 7 / m7 / maj7 / 6 / m7♭5 / sus4 / dim / aug / add9” and the chord you just placed changes on the spot
- The semitone shifts (♭♭ / ♭ / 0 / ♯ / ♯♯) let you write borrowed chords (♭III, ♭VI and so on)
Anything not in the list — slash chords such as G/B — can be typed straight into the beat field.
8.2 Lay down a famous progression
“Pick a chord progression” lays one of 14 well-known progressions across a range, repeating to fill the space:
Royal Road / Marunouchi / Komuro / Just the Two of Us / Canon / Pop-punk / 456 / Circular / Fifties / ii–V–I / vi–ii–V–I / Three chords / 12-bar blues / Relative minor rock.
Choose the range (this bar / this section / whole song) and “One” or “Two” chords per bar, then press “Lay this progression”.
9. Manage Parts
Editing target “Manage parts”: the list of parts the song has.
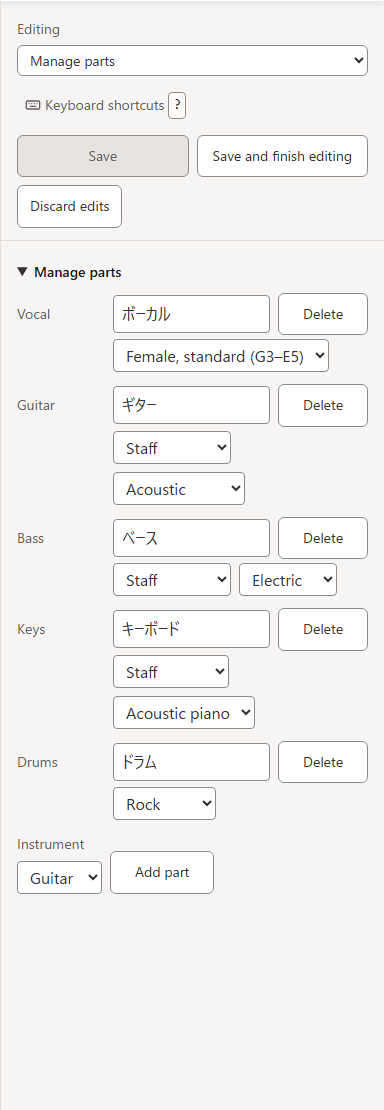
| Item | What it does |
|---|---|
| Instrument | The selector left of the name. A part can be changed between Vocal / Guitar / Bass / Keys after the fact (below). Drums are the exception: a drum part cannot be changed, and no other part can become one |
| Name | The name printed on the stave. “Gt 2”, “Backing vocals” and so on are fine |
| ↑ ↓ | Move the stave one place up or down |
| Notation | How the stave is written. Strings: Staff / TAB / Staff + TAB. Keys: Staff / Grand staff. Vocals and drums are fixed |
| Sound | Guitar = Acoustic / Clean / Distortion, Bass = Acoustic / Electric, Keys = Acoustic piano / Electric piano, Drums = Rock / Pop / Jazz / Neo Soul |
| Vocal range (vocals only) | Female or male × high / standard / low. It sets the register the melody suggestion writes in, and the octave on paper (male ranges are written an octave up with an 8 under the clef) |
| Delete | Removes the part along with its notes |
| Add part | Pick an instrument (Vocal / Guitar / Bass / Keys / Drums) and add it. At most one drum part |
Notation and sound are part of the song, so everyone who opens it sees the same page and hears the same instruments. Lyrics are drawn under the lead vocal (the first vocal part) only; other vocal staves carry notes alone. With two vocal parts, reordering them with ↑↓ moves the lyrics to whichever one is now first.
Changing the instrument keeps the notes you wrote, but anything the new instrument cannot say is dropped.
| What is dropped | When |
|---|---|
| String assignments | On any instrument change (grace notes included). Fingering is chosen again for the new instrument |
| Techniques (bends and so on) | When the new instrument has no frets (vocals, keys) |
| Notation, sound, vocal range | When the new instrument does not offer that choice (it returns to the default) |
Guitar, bass and male vocal ranges are written an octave above the sounding pitch, so changing across that line changes the octave on paper (the notes themselves do not move). A one-line note says so right after the change. While a keyboard grand staff has notes in the left hand, that part cannot be changed to another instrument — the left-hand stave would have nowhere to go.
10. Writing the Parts
Selecting a part as the editing target brings up the input pad at the bottom. The pad is the only way notes are placed — clicking the score moves the cursor.
10.1 Controls every pad has
| Control | What it does |
|---|---|
| Quantize | How many steps a beat is divided into: ♩ (1), ♪ (2), 16ths (4), 32nds (8), plus 3, 6 and 12. It sets both the ruler on the score and where a click snaps (the default is 4, i.e. 16ths) |
| Note value | Whole / half / quarter / eighth / sixteenth, plus a dot. Tuplets are 3 / 5 / 6 / 7 |
| R | Rest (move on without placing) |
| ⟲ | Copy the previous bar’s contents into this bar |
| ⌫ / Del | ⌫ erases the note before the cursor and steps back; Del erases the note here and leaves the cursor where it is |
| ← → / |◀ bar number ▶| | Move the cursor one step, or a whole bar, at a time |
| ⌣ | Tie to the next note |
| gr | Grace-note mode. While it is on, what you place becomes a grace note before the previous note and takes no beat |
| ⌃ | Fold the tool row (quantize, note value, tuplet). It sits at the right end; folding gives that height to the surface below (the keyboard or the grid) |
If the note value you picked does not fit where you are, it shrinks to the longest value that does — and the pad tells you so.
⌃ folds the first row only — the second row, which you touch for every note, stays. While it is folded the values in effect are still readable as text (“Quantize 16ths · Note value ♩.”). Whether it is folded is remembered per device. It does not appear on narrow screens, where ”…” does the same job.
10.2 Keyboard
Type note names (A–G) or press the keys. Press a lit key again to delete it.
- ♭ / ♮ / ♯: an accidental for the next note only
- ch: chord-stacking mode. While it is on, notes you place stack at the same position (
Shift+note namestacks once) - As pressed / Follow key: “As pressed” plays the note name exactly as typed; “Follow key” runs it through the key signature (F becomes F♯ in G major)
- Octave: the − and + at the ends of the keyboard
For a keyboard part on a grand staff, the pad grows a “Right hand / Left hand” pair to choose which stave you are writing on.
10.3 Piano roll
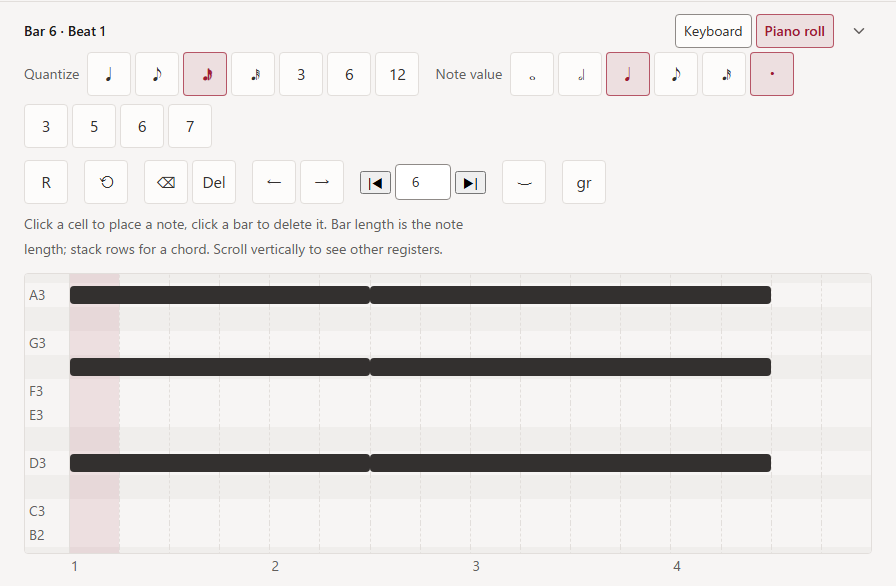
A DAW-shaped grid. Click a cell to place a note, click a bar to delete it. The bar’s length is the note’s length, and stacking rows makes a chord. Scroll vertically to reach other registers.
10.4 TAB
Available for a guitar or bass whose notation is “TAB” or “Staff + TAB”. Tap a cell in the string × fret grid to place that fret on that string. Digits work too (type two digits quickly for 10+).
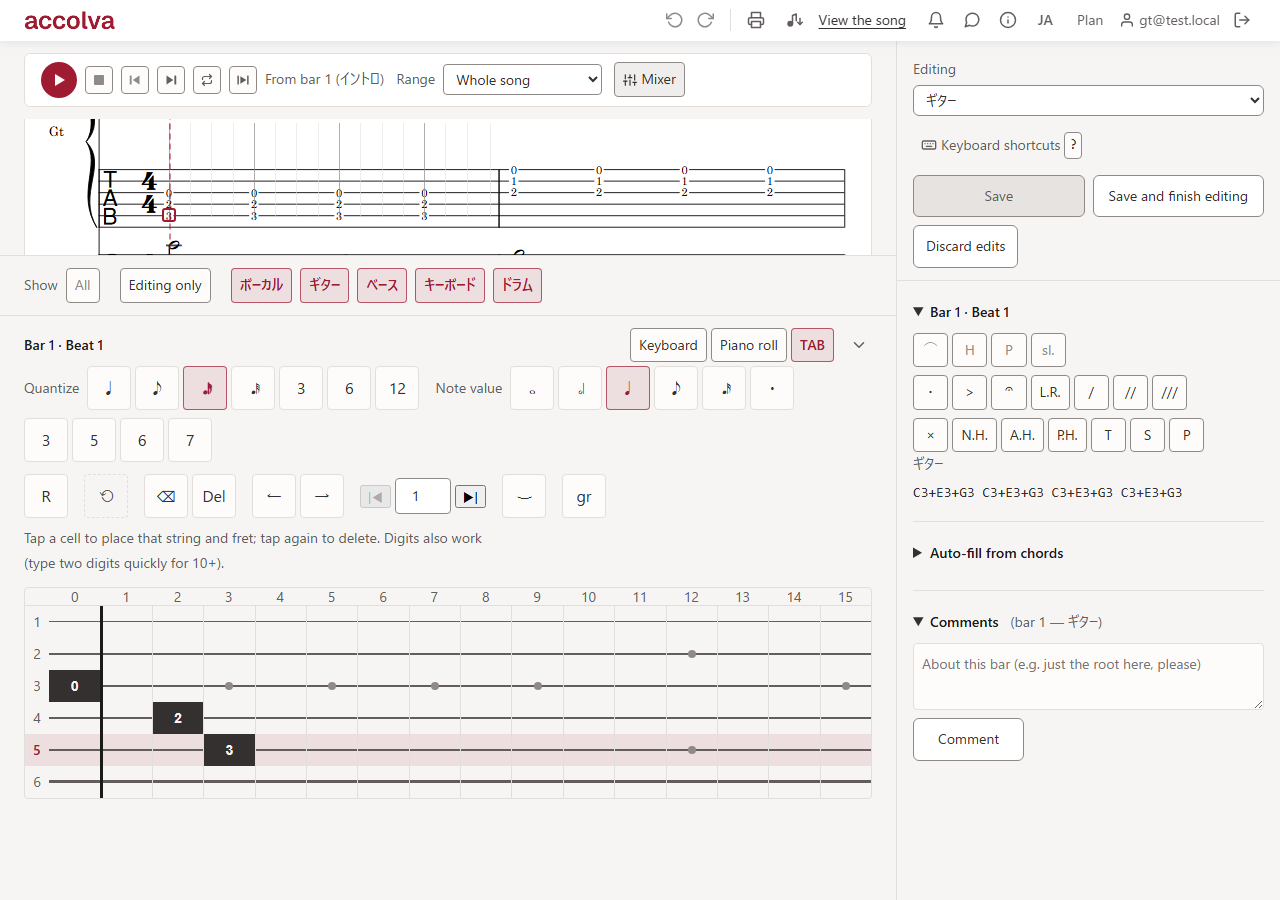
Notes you have not assigned a string to are placed where the hand has to move the least. To move a written note to another string without changing the pitch, use Alt+↑↓.
A note the instrument cannot fret (below the lowest open string, for instance) is drawn as an ×, not as a rest — a rest is an instruction to stay silent, and the two should not be confused.
A TAB stave draws no stems, beams or tuplet brackets (the classic shape for TAB). In “Staff + TAB” the rhythm is stated by the staff above. A TAB-only stave is numbers alone, so set the notation to “Staff + TAB” if you want the rhythm on paper as well.
10.5 Drums
Rows are drums (crash / ride / hi-hat / tom / snare / floor tom / kick) and columns are steps. Click a cell to place a hit, click again to delete it. Initials work too (K kick, S snare, H hi-hat, R ride, C crash, T tom, F floor tom).
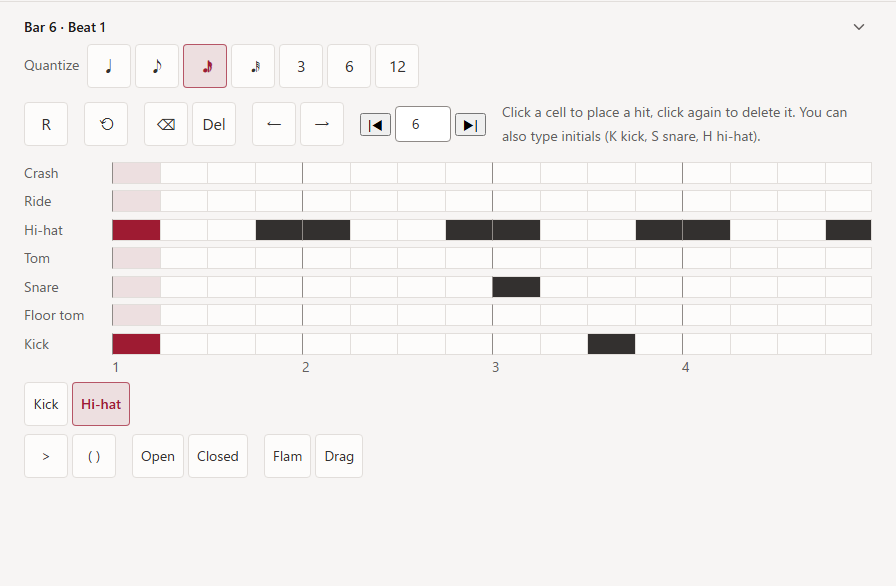
Under the grid is the flavour row. Pick which drum you are attaching to, then choose from three axes.
| Axis | Options |
|---|---|
| Dynamic | Accent (>) / ghost (( )) |
| Technique | Hi-hat = open / closed, snare = cross-stick, ride = bell / choke, crash = choke. Only shown for drums that have one |
| Grace | Flam (one hit before) / drag (two hits before) |
10.6 Articulation
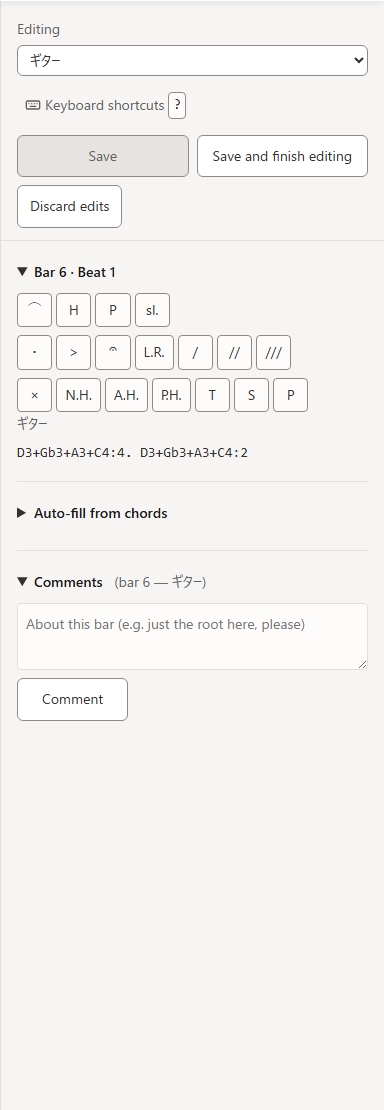
Put the cursor on a note and the symbol buttons appear at the top of the panel.
| Layer | Options |
|---|---|
| From the previous note | Slur (⌒) / hammer-on (H) / pull-off (P) / slide (sl.) |
| Marks on the note | Staccato (·) / accent (>) / fermata / let ring (L.R.) / tremolo (/ = eighths, // = sixteenths, /// = thirty-seconds). More than one can apply |
| String technique | Muted (×) / natural harmonic (N.H.) / artificial harmonic (A.H.) / pinch harmonic (P.H.) / tapping (T) / slap (S) / pop (P). One at a time, guitar and bass only |
Symbols are not decoration for the printout: they are baked into playback and MIDI export too.
10.7 Lyrics
While editing the lead vocal, type a bar’s worth of text into “Lyrics”. Syllables line up under the melody notes, and the field reports “N melody notes / M syllables” so you can check the split. Separate them with spaces to control it (Japanese kanji count as one syllable each, so spacing them out is how you match the reading).
If the second time round has different words, press “Add verse 2”. On paper the verses stack under the vocal stave in order.
11. Drafting from the Chords
11.1 The backing (auto-fill from chords)
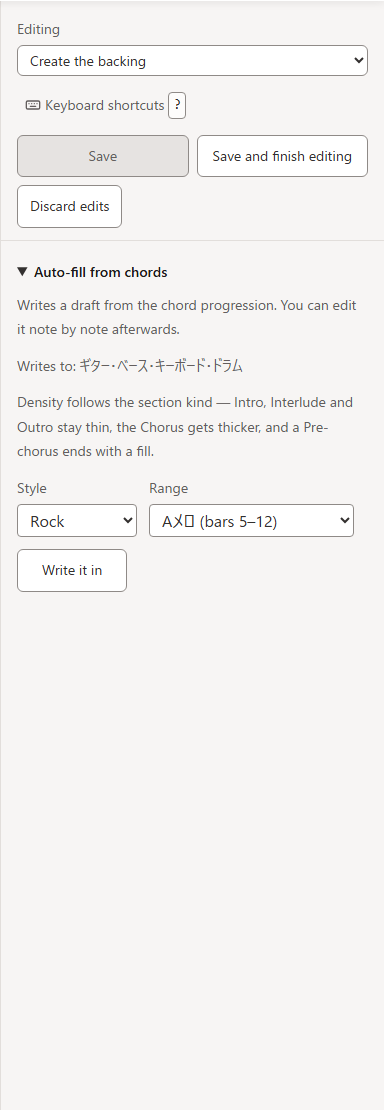
Editing target “Create the backing”. It writes a draft for guitar, bass, keys and drums over the chord progression, all at once.
| Item | What it does |
|---|---|
| Style | Rock / Pop / Funk / Jazz / Bossa Nova / Ballad / Shuffle / Neo Soul |
| Range | This bar / this section / whole song |
| Write it in | Replaces whatever notes are in that range (it asks first) |
| Try again | Every press draws a different combination. If the previous one was better, undo (Ctrl+Z) brings it back |
Density follows the section kind — intro, interlude and outro stay thin, the chorus gets thicker, and a pre-chorus ends with a fill. Once it is written in, you edit it note by note.
Note that no LLM is involved: the draft is assembled from the chord progression and the section kinds, which is why it appears the instant you press the button.
11.2 Melody suggestion
While editing a vocal part, open “Suggest a melody” in the panel to draft a melody over the chord progression. Pick a range and press “Suggest a melody”.
- Nothing is written where no one is singing (intro, interlude, outro)
- The register stays inside the vocal range set under “Manage parts”
- If lyrics are present, “Fit to the lyrics” matches the number of notes to the number of syllables (the beats do not move)
If you do not like it, draw again or undo (Ctrl+Z).
12. Playing the Song
accolva plays what you wrote. It does not generate a separate backing track — the notes on the score are the notes you hear — so the page and the sound never drift apart. The instrument samples ship with the app (no plugins, no extra downloads).
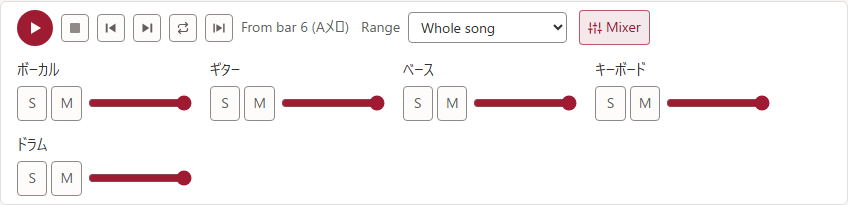
| Control | What it does |
|---|---|
| Play / pause | Space toggles it too |
| ■ | While the song is sounding it only stops (▶ resumes from the same place). Pressed when nothing is sounding, it rewinds to the start of the range being played |
| Previous bar / Next bar | Move the bar playback starts from, one at a time. Pressed mid-playback, it restarts from that bar |
| Loop | Repeat the selected range |
| Play this bar | Play just the bar the cursor is in |
| Range | Whole song, or one section |
| Mixer | S (solo) / M (mute) and a fader per voice |
Solo plays only the voices you raised, and mute beats solo (if both are on, the voice stays quiet). S/M and the faders describe how you are listening, so they are not saved with the song (a fader takes effect from the next playback).
The playhead is drawn as a vertical line over the score.
13. Writing Together
13.1 Comments
Select a part as the editing target, put the cursor in the score, and the comment box at the bottom of the panel binds to that bar and that part. Write and press “Comment”. (Comments attach to parts only — not to song settings, structure or chords.)
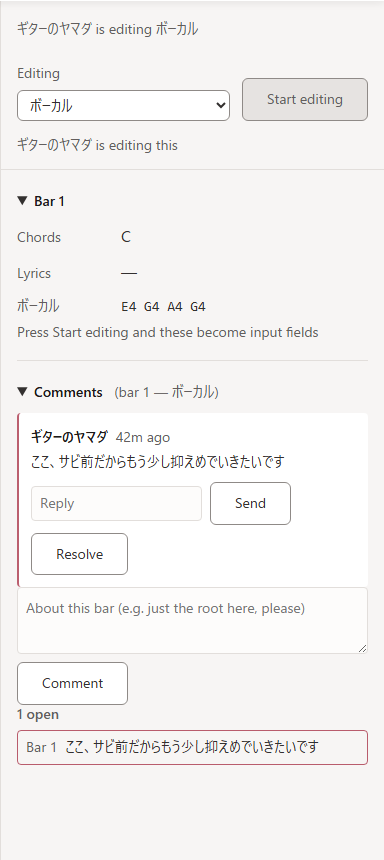
- Threads take replies. When the matter is settled, press “Resolve” (“Reopen” undoes it)
- A comment is not an edit, so you can post one even while the target is locked
- A posted comment cannot be edited — say it again as a new message
- Open threads are listed below; press one to jump to that bar
- A bar with comments shows a speech-bubble mark above the score
13.2 Notifications
When a comment is posted, everyone concerned — the band’s members, the song’s owner, and anyone in the thread — gets an in-app notification. Your own actions never notify you.
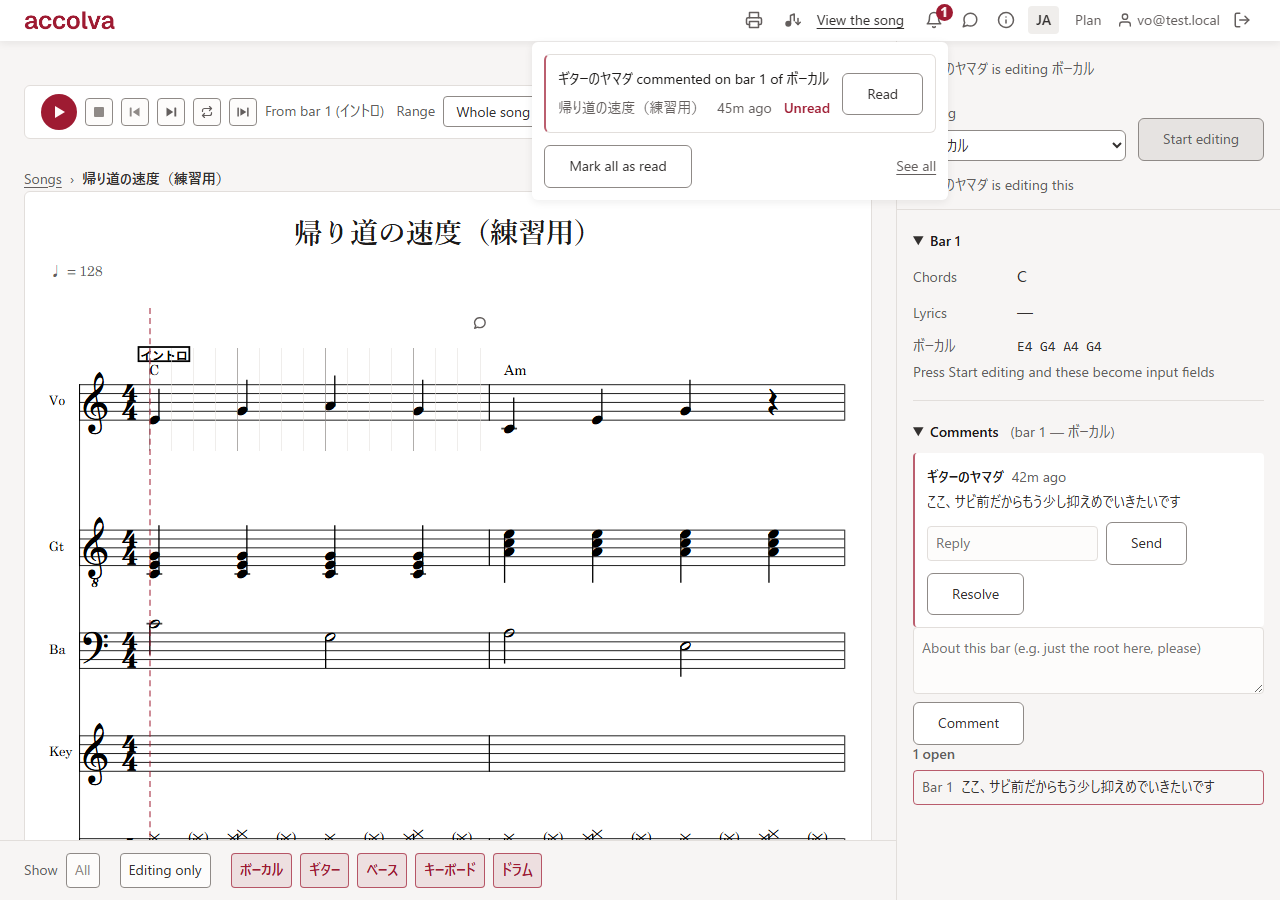
The bell in the bar carries the unread count. Press it and recent notifications drop down; press a row to go straight to that bar. Opening the list does not mark anything read — only “Read” on a row, or “Mark all as read”, does. “See all” opens the full notifications page.
13.3 The editing lock
While someone has an editing session open, the bars they hold are locked for everyone else and show their name: ”Name is editing target“. Two people can never write over the same place at once — different parts go on in parallel, and so does the same part in different bars (see “5.2 Editing sessions”).
13.4 Sharing
“Who can open this song” on the song page decides how far someone with the link may go (owner only).
| Setting | What it means |
|---|---|
| Private | Only your band members can open it. The link won’t work for anyone else |
| Anyone with the link can view and comment | Anyone with the link can read it. Commenting requires signing in |
| Anyone with the link can edit | Anyone with the link can read it, and can edit it once signed in |
None of these make the song findable by search — the song list only ever shows your own songs and your bands’ songs.
14. Taking It Out
14.1 Printing (A4)
The printer icon in the bar asks for bars per line (Auto / 1 / 2 / 3 / 4) and then prints. “Auto” decides the split from how much is in each bar.
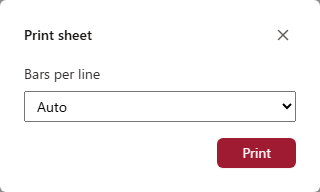
- On-screen-only marks — the cursor line, the ruler, the selection band — are not printed
- What prints is the parts you currently have shown, so leaving one part visible gives you a part sheet as-is
14.2 MIDI export
The note-and-arrow icon in the bar exports the song you are looking at as MIDI (SMF). Each voice gets its own track and drums go to a percussion track. Repeats and navigation signs are already expanded, so it plays straight through when you open it in a DAW.
For the other direction — building a song out of a MIDI or MusicXML file — see “2.4 Importing from a file”.
15. On a Phone
On a narrow screen the score takes the lead and the input pad moves to a dock at the bottom edge. Secondary controls in the bar fold into ”…“.
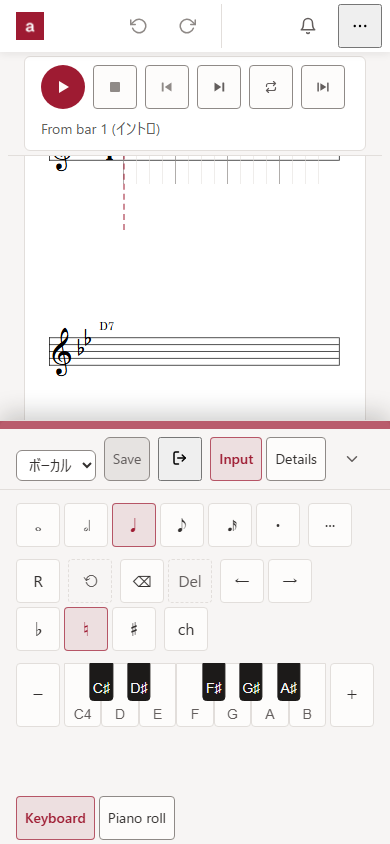
The dock holds the editing target, Save, finish editing, and an “Input / Details” switch — “Input” is the pad, “Details” is the current bar’s fields and the comments. Drag the top of the dock to resize it, so the score stays reachable with the pad open.
A phone shows the score one bar per line at actual size, so neither the zoom nor the ⌃ that folds the tool row appears (the pad’s secondary tools live under ”…”).
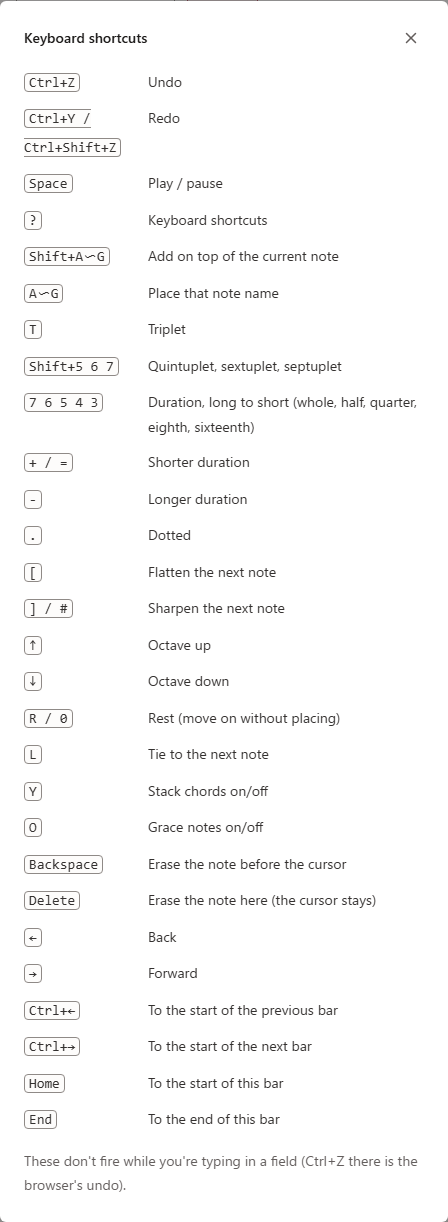
16. Keyboard Shortcuts
The list opens from “Keyboard shortcuts” in the panel (or ?) while you are editing, and shows only what is active right now. Shortcuts do not fire while you are typing in a field (Ctrl+Z there is the browser’s undo).
16.1 Anywhere
| Action | Key |
|---|---|
| Undo | Ctrl + Z |
| Redo | Ctrl + Y / Ctrl + Shift + Z |
| Play / pause | Space |
| Keyboard shortcuts | ? |
16.2 Structure (section level)
| Action | Key |
|---|---|
| Copy the selected sections | Ctrl + C |
| Cut the selected sections | Ctrl + X |
| Insert the clipping after the selection | Ctrl + V |
| Delete the selected sections, bars and all | Delete |
| Move earlier / later | Alt + ← ↑ / Alt + → ↓ |
| Extend the selection back / forward | Shift + ← ↑ / Shift + → ↓ |
| Collapse the selection | Escape |
| Descend to the bar level | Enter |
16.3 Structure (bar level)
The same keys apply to bars. Escape collapses the selection and, when it is already a single bar, goes back up to the section level.
16.4 Note input (keyboard pad)
| Action | Key |
|---|---|
| Place that note name | A–G |
| Add on top of the current note | Shift + A–G |
| Stack chords on/off | Y |
| Triplet | T |
| Quintuplet, sextuplet, septuplet | Shift + 5 / 6 / 7 |
| Duration, long to short (whole, half, quarter, eighth, sixteenth) | 7 6 5 4 3 |
| Shorter / longer duration | + (=) / - |
| Dotted | . |
| Flatten / sharpen the next note | [ / ] (#) |
| Octave up / down | ↑ / ↓ |
| Rest (move on without placing) | R / 0 |
| Tie to the next note | L |
| Grace notes on/off | O |
| Erase the note before the cursor | Backspace |
| Erase the note here (the cursor stays) | Delete |
| Back / forward | ← / → |
| To the start of the previous / next bar | Ctrl + ← / Ctrl + → |
| To the start / end of this bar | Home / End |
16.5 Piano roll
Pitch is handled by the grid, so there are no note-name keys (A–G) and no octave, accidental or chord keys. Everything else — durations, tuplets, rests, ties, grace notes, erasing, moving — is the same as the keyboard pad.
16.6 TAB
| Action | Key |
|---|---|
| Press that fret | 0–9 (10+ from the grid) |
| Up / down a string (the string you are about to play) | ↑ / ↓ |
| Move the written note up / down a string (pitch unchanged) | Alt + ↑ / Alt + ↓ |
| Rest | R |
| Shorter / longer duration | + (=) / - |
Dots, tuplets, ties, grace notes, erasing and moving are as on the keyboard pad. Digits are frets here, so durations are stepped with + / -.
16.7 Drums
| Action | Key |
|---|---|
| Place / remove a drum | K kick, S snare, H hi-hat, R ride, C crash, T tom, F floor tom |
| Step (quarter, eighth, sixteenth) | 5 4 3 |
| Make the step a triplet / undo it | Shift + 3 |
| Erase the column before / at the cursor | Backspace / Delete |
| Back / to the next step | ← / → |
17. Song limit
accolva is free to use. The score, sharing, comments, playback, A4 printing and MIDI export all work without restrictions.
| Item | Limit |
|---|---|
| Songs you can keep | 5 |
| Length of a song | 300 bars |
Only songs shown in your list count; deleted songs don’t. When the limit is reached you cannot create new songs, but songs you have already saved are never deleted — delete one you no longer need and you can create again.
The paid Pro plan closed to new subscriptions on September 29, 2026.
18. Requirements
- Runs in an up-to-date Chrome or Edge (desktop and phone; nothing to install)
- Instrument samples are built in — no plugins, no extra downloads
- An internet connection is required
Requests and bug reports go through the speech-bubble button in the bar (it works even when you are not signed in).
Related: accolva — create and co-edit band scores in your browser (product page)