A Guitarist's Guide to ii-V — Breaking Down V7 with Related IIm7
By Masashi Y.
“Jazz charts are full of ii-Vs — even in spots where the original progression had just a single V7.” “When you split a lone V7 into a ii-V, what actually changes on the fretboard?”
Once you’ve learned how secondary dominants (see previous article) add a V7 outside the diatonic set, the next reharmonization technique every guitarist runs into is Related IIm7 (ii-V decomposition). The idea is simple: insert a IIm7 right before any standalone V7, turning it into a “ii-V pair.”
In this article, we’ll reframe Related IIm7 as “a tool for extending the guide tone line.” If you read along holding shell voicings (the 2 notes on strings 4-3 or 5-4), you’ll start to see that the “classic jazzy sound” of ii-V-I comes from just a couple of semitone moves on the fretboard.
What Is Related IIm7?
Related IIm7 means inserting the IIm7 chord that sits a fourth below (= a fifth above) any dominant 7th chord, right before it.
- Original: G7 → Cmaj7
- Decomposed: Dm7 → G7 → Cmaj7
Original: V7 → I
G7
Cmaj7
Decomposed: IIm7 → V7 → I
Dm7
G7
Cmaj7
Relative to G7, Dm7 sits a fourth below. If you view G7 as the “V,” then Dm7 becomes the “II.” That’s where the name “Related IIm7” comes from.
It’s the mirror image of secondary dominants (which add a V7/X). This time, by adding a IIm7/X, any V7 can be reframed as a “ii-V pair.”
Why Decompose?
In jazz theory, there are two main reasons Related IIm7 strengthens a progression.
1. The Cadence Is Reinforced
The approach to the target chord changes from V7 alone (Dominant → Tonic) to IIm7 → V7 (Subdominant → Dominant → Tonic). That’s the basic cadence — widely considered the strongest arrival sound in diatonic harmony. Compared to a lone V7, the tonal pull and sense of landing on the target are theoretically stronger.
The reason “putting II-V before Cmaj7 feels more ‘real’” than a bare V7 is exactly this mini-cadence taking shape.
① V7-only cadence (Dominant → Tonic)
② II-V-I cadence with IIm7 prepended (Subdominant → Dominant → Tonic)
2. Harmonic Rhythm Is Subdivided, Creating Drive
In jazz you’ll constantly see dominant 7ths back to back — G7 → C7, for example. If each gets a full bar, you only get two chord changes in two bars. But prepending each V7 with its matching IIm7 gives you four chord changes in the same two bars.
- Original: G7 (1 bar) | C7 (1 bar) — 2 chord changes
- ii-V version: Dm7 → G7 (half bar each) | Gm7 → C7 (half bar each) — 4 chord changes
Doubling the rate of chord changes generates harmonic drive. The “ii-V feel” that defines jazz comes in large part from this subdivided harmonic rhythm.
① Consecutive dominants: G7 → C7, one per bar
② Prepend IIm7 before each V7: Dm7 G7 | Gm7 C7
A Side Effect: The Guide Tone Line Extends Naturally
The two reasons above are a bit abstract, but on the guitar fretboard they show up concretely as “the guide tone line gets one step longer.” This is the perspective we’ll keep returning to throughout the article.
In a lone V7 → I, the guide tones (3rd and ♭7) move only one step. Insert a IIm7 in front, and the same two voices now move across two steps, producing a flowing semitone-centered line.
Let’s look at the shell voicings of ii-V-I (Dm7 → G7 → Cmaj7) as two voices:
| Progression | Dm7 | G7 | Cmaj7 |
|---|---|---|---|
| Voice 1 | F (3rd) | F (♭7, held as common tone) | E (3rd, steps down a half step) |
| Voice 2 | C (♭7) | B (3rd, steps down a half step) | B (7th, held as common tone) |
Each voice cycles through ”swap the roles of 3rd and ♭7, hold as a common tone or step down a half step” — the classic jazz guide-tone behavior. That’s the guide tone line, and it’s at the heart of the ii-V-I sound.
Map it onto the fretboard and you’ll see how little the fingers actually move.
A lone V7 → I resolves in a single step; insert a IIm7 in front and that becomes a two-step dominant cycle. Cadence reinforcement and harmonic rhythm subdivision — on the fretboard, they both show up as this very repetition of semitones.
Resolution to Minor Uses IIm7♭5 (Minor II-V)
When the target is a minor chord (Dm7, Em7, Am7, etc.), the Related IIm7 you place in front should be m7♭5 (half-diminished) rather than m7 — this is the jazz standard. It’s called the “minor II-V.”
The reason is simple: treat the target as a temporary Im, and the key becomes minor. In a minor key, the diatonic II is IIm7♭5, so borrowing that is the most natural choice.
Example: Putting Related II Before A7 → Dm7
| Choice | Progression | Background |
|---|---|---|
| Major-derived | Em7 → A7 → Dm7 | Keeps C major diatonic (Em7 is the III) |
| Minor-derived (standard) | Em7♭5 → A7(♭9) → Dm7 | Borrowed from D minor (Em7♭5 is the II of D minor) |
Em7♭5 consists of E-G-B♭-D. The B♭ comes from the D minor scale, and adding ♭9 to A7 brings in the A harmonic minor sound — the whole progression stays tonally consistent with a strong minor resolution.
In the scale-choice section of the secondary dominants article, I wrote that ”resolving to minor? Use Phrygian dominant / ♭9 / ♭13 on the V7.” Em7♭5 → A7(♭9) → Dm7 just extends that principle to the II — “if the target is minor, line up the minor key color across the whole ii-V.”
When to Use Which
- Em7 (major-derived): keeps the C major sound all the way into Dm7. Brighter, more pop-leaning.
- Em7♭5 (minor-derived, standard): when you want the melancholy and darkness that only a true minor resolution produces. Extremely common in jazz standards.
Neither is “correct” — pick the color you want. But remember that “ii-V into minor uses m7♭5” is the jazz canonical form worth having under your fingers.
① Major-derived: Em7 → A7 → Dm7 (C major diatonic)
② Minor-derived (standard): Em7♭5 → A7♭9 → Dm7 (borrowed from D minor)
Real-World Examples: Standard Tune Patterns
Now that we’ve covered both the major ii-V (IIm7-V7) and the minor ii-V (IIm7♭5-V7), let’s see how Related IIm7 actually behaves in two of jazz’s most common situations.
Turnaround
Over a cyclic progression (Cmaj7 → A7 → Dm7 → G7), both A7 and G7 are dominant 7ths. A common move is to place a IIm7 in front of each and create two II-Vs.
- Original: Cmaj7 → A7 → Dm7 → G7
- Decomposed: Cmaj7 → Em7 → A7 → Dm7 → G7
The Related IIm7 of A7 is Em7 (a fourth below A). Em7-A7 becomes one II-V pair, joining the existing Dm7-G7 to form two consecutive ii-Vs.
The target of A7 is Dm7 — a minor chord — so strictly speaking, the previous chapter’s principle would favor Em7♭5 → A7(♭9). But in a cyclic-progression context, treating Dm7 as the ii of C major (a passing chord) and using major-derived Em7 is also extremely common. Both are “correct” — pick based on the color you want.
Original: Cmaj7 → A7 → Dm7 → G7
Decomposed: Prepend Em7 before A7 — two consecutive ii-Vs
Reharmonizing a 3-Chord Blues into “Jazz Blues”
One of the most-played progressions in jazz sessions, the “jazz blues,” is actually a showcase for this technique. It’s a plain 12-bar blues (the I7-IV7-V7 three-chord pattern) reharmonized by inserting ii-Vs at key points — making it a progression packed with Related IIm7 in action.
First, let’s hear the plain 12-bar blues.
Next, the jazz blues version. Three ii-Vs are inserted at bars 4, 8, and 12.
Auditioning each insertion separately makes it easier to hear what each one is doing.
- Bar 4:
Gm7 C7— The next bar’sF7is treated as V7 of F, so its IIm7 (Gm7) is prepended. - Bar 8:
Em7 A7— A7 is the V7 going to Dm7. Since the target is minor,Em7♭5 A7(♭9)is the strict standard, but in jazz blues the conventionalEm7is often used (the blues has a built-in major/minor ambiguity). - Bar 12:
Dm7 G7— The classic turnaround ii-V, driving back to C7 at the top.
Beyond that, bars 9-10’s Dm7 → G7 → C7 also works as a ii-V-I. So jazz blues fits four Related IIm7 applications into just 12 bars — it’s practically a museum of reharmonization.
Combining with Secondary Dominants and Tritone Subs
Related IIm7 really comes alive when combined with secondary dominants and tritone substitutions.
Putting IIm7 Before a Secondary V7
- Original: Cmaj7 → A7 → Dm7
- Decomposed: Cmaj7 → Em7 → A7 → Dm7
Put Em7 (the Related IIm7) in front of A7 (a V7/II) and you’ve inserted a temporary II-V.
① Original: Cmaj7 → A7 → Dm7
② Decomposed: Prepend Em7 → Em7 A7 ii-V
Pairing Related IIm7 With a Tritone Sub
You can also put the IIm7 of the tritone sub D♭7 — which is A♭m7 — in front of it, creating yet another II-V.
- Original: Dm7 → G7 → Cmaj7
- Tritone substituted: Dm7 → D♭7 → Cmaj7
- Plus Related IIm7: Dm7 → A♭m7 → D♭7 → Cmaj7
The bass moves D → A♭ → D♭ → C. Dm7 to A♭m7 is a tritone (augmented 4th) jump, but from there, A♭ → D♭ (down a fifth, a strong progression) and D♭ → C (down a half step) land smoothly. Because a complete ii-V in a distant key (D♭) is suddenly dropped in, you get the thrilling modern-jazz sound this combo is known for.
If you want to commit to a fully chromatic bass line, a common option is to drop Dm7 entirely and go A♭m7 → D♭7 → Cmaj7, or to pass through Dm7 quickly.
① Standard ii-V-I: Dm7 → G7 → Cmaj7
② Tritone sub: Replace G7 with D♭7 → Dm7 → D♭7 → Cmaj7
③ Add Related IIm7: Prepend A♭m7 → Dm7 → A♭m7 D♭7 → Cmaj7
Extended Dominants — Stacking Related IIm7 Over a V7 Chain
Push secondary dominants further and you get extended dominants: chaining multiple V7s down by perfect fifths.
Basic Form: V7s Cascading Down by Fifths
An extended example in C major:
- Cmaj7 → E7 → A7 → D7 → G7 → Cmaj7
The roots cascade E → A → D → G → C, each a fifth below the last. On the circle of fifths, that’s one step counter-clockwise at a time. Each V7 functions as a Secondary Dominant treating the next V7 as a temporary I, linking dominant tension into a continuous chain.
Compared to the diatonic cycle (Cmaj7 → Em7 → Am7 → Dm7 → G7 → Cmaj7), you can see that III, VI, and II have all been made dominant 7ths.
① Diatonic cycle: Cmaj7 → Em7 → Am7 → Dm7 → G7 → Cmaj7
② Extended dominant: turn III/VI/II into dominants → Cmaj7 → E7 → A7 → D7 → G7 → Cmaj7
Stacking Related IIm7 → A Long ii-V Chain
Preface each V7 with its Related IIm7 and you get a long chain of uninterrupted ii-V pairs:
- Bm7 → E7 → Em7 → A7 → Am7 → D7 → Dm7 → G7 → Cmaj7
That’s a 9-chord “ii-V-ii-V-…-ii-V-I.” It’s the bridge of the Rhythm Changes (the cycle from “I Got Rhythm”), III7 → VI7 → II7 → V7 — and bebop-era players like Charlie Parker routinely decomposed these dominant chains into chains of ii-V to build improvised lines. It’s this technique, applied in practice.
① Extended dominant alone: Cmaj7 → E7 → A7 → D7 → G7 → Cmaj7
② Add Related IIm7 before each V7 → Bm7 E7 | Em7 A7 | Am7 D7 | Dm7 G7
A Functional Note
- Each V7 repeatedly makes a “deceptive cadence into the next ii.” A7 “should” resolve to D (major or minor), but instead keeps landing on the next ii (Am7). Only the final G7 → Cmaj7 delivers a genuine resolution.
- The A7 → Am7 move is actually minimal. In shell voicings, the A7 guide tones are C♯ (3rd) and G (♭7); Am7’s are C (♭3) and G (♭7). So G is held as a common tone while C♯ drops a half step to C. “Dominant morphing into minor” happens with a single semitone on the fretboard — the engine of each ii-V restarting ultra-smoothly. This is the same guide-tone half-step motion we’ve been seeing throughout the series, quietly at work again.
- The Related IIm7s inside the chain are m7 (not ♭5). Because every next V7 points to a major-ish target (and the chain ultimately lands on Cmaj7), we treat them as major II-Vs chained together. Minor II-Vs (Em7♭5, etc.) only show up when the final target is a minor chord.
Connection to Other Articles
Extended dominants are simply secondary dominants combined with Related IIm7 — you already have both pieces, so there’s nothing intimidating about them. A useful way to practice is to walk counter-clockwise around the circle of fifths while chanting “ii-V, ii-V, ii-V, ii-V, I.”
Common Misuses
- Putting a IIm7 before a maj7 or m7. Related IIm7 is strictly about prefacing a dominant 7th. Placing it in front of a maj7 or m7 is a different idea (like ii-V-into-ii-V).
- Holding the IIm7 too long. II-V is a single unit. Stretching II over a full bar and V over another can drag. II in the first half, V in the second (or an uneven II half-beat + V two-and-a-half-beats) brings forward momentum back.
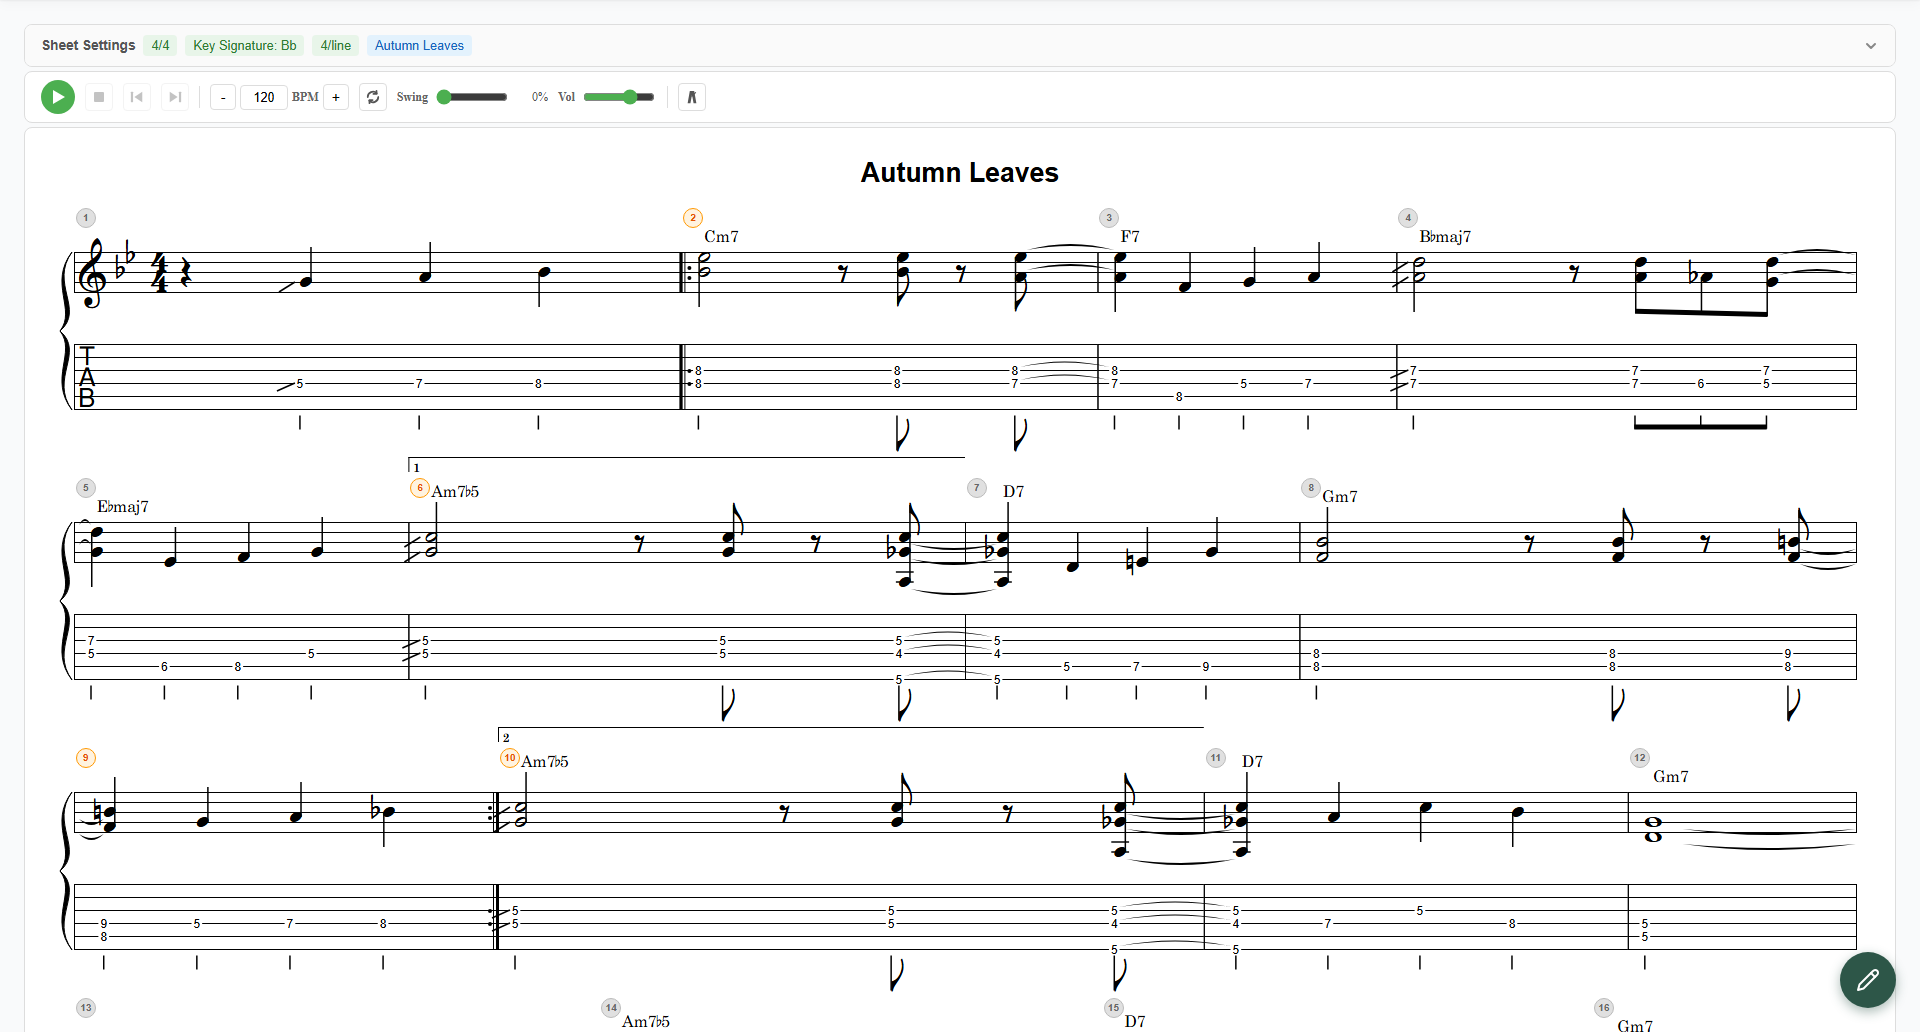
notave — Generate Continuous II-V-I Voicings
notave takes a chord progression and returns voice-leading-aware recommendations focused on II-V-I flow.
- Suggests natural voice motion for two-stacked ii-Vs like Em7 → A7 → Dm7 → G7 → Cmaj7
- Switch between Drop2 / shell / two-note guide tone versions
- Renders as TAB and staff notation with playback
You won’t have to figure out “what do I play over the IIm7?” from scratch every time you use Related IIm7.
No install required, free to use right now.