Last updated: October 14, 2026
This document is a reference manual for notave, a browser-based guitar/bass TAB and staff notation editor. It documents each screen element and feature with screenshots.
On first launch you get a single line of guidance — click the notation to start entering notes — and nothing else in the way (the old 8-step tour is now opt-in from the help dialog). The full keyboard shortcut list is available anytime from the keyboard icon in the top bar (or the ? key).
1. Screen Layout
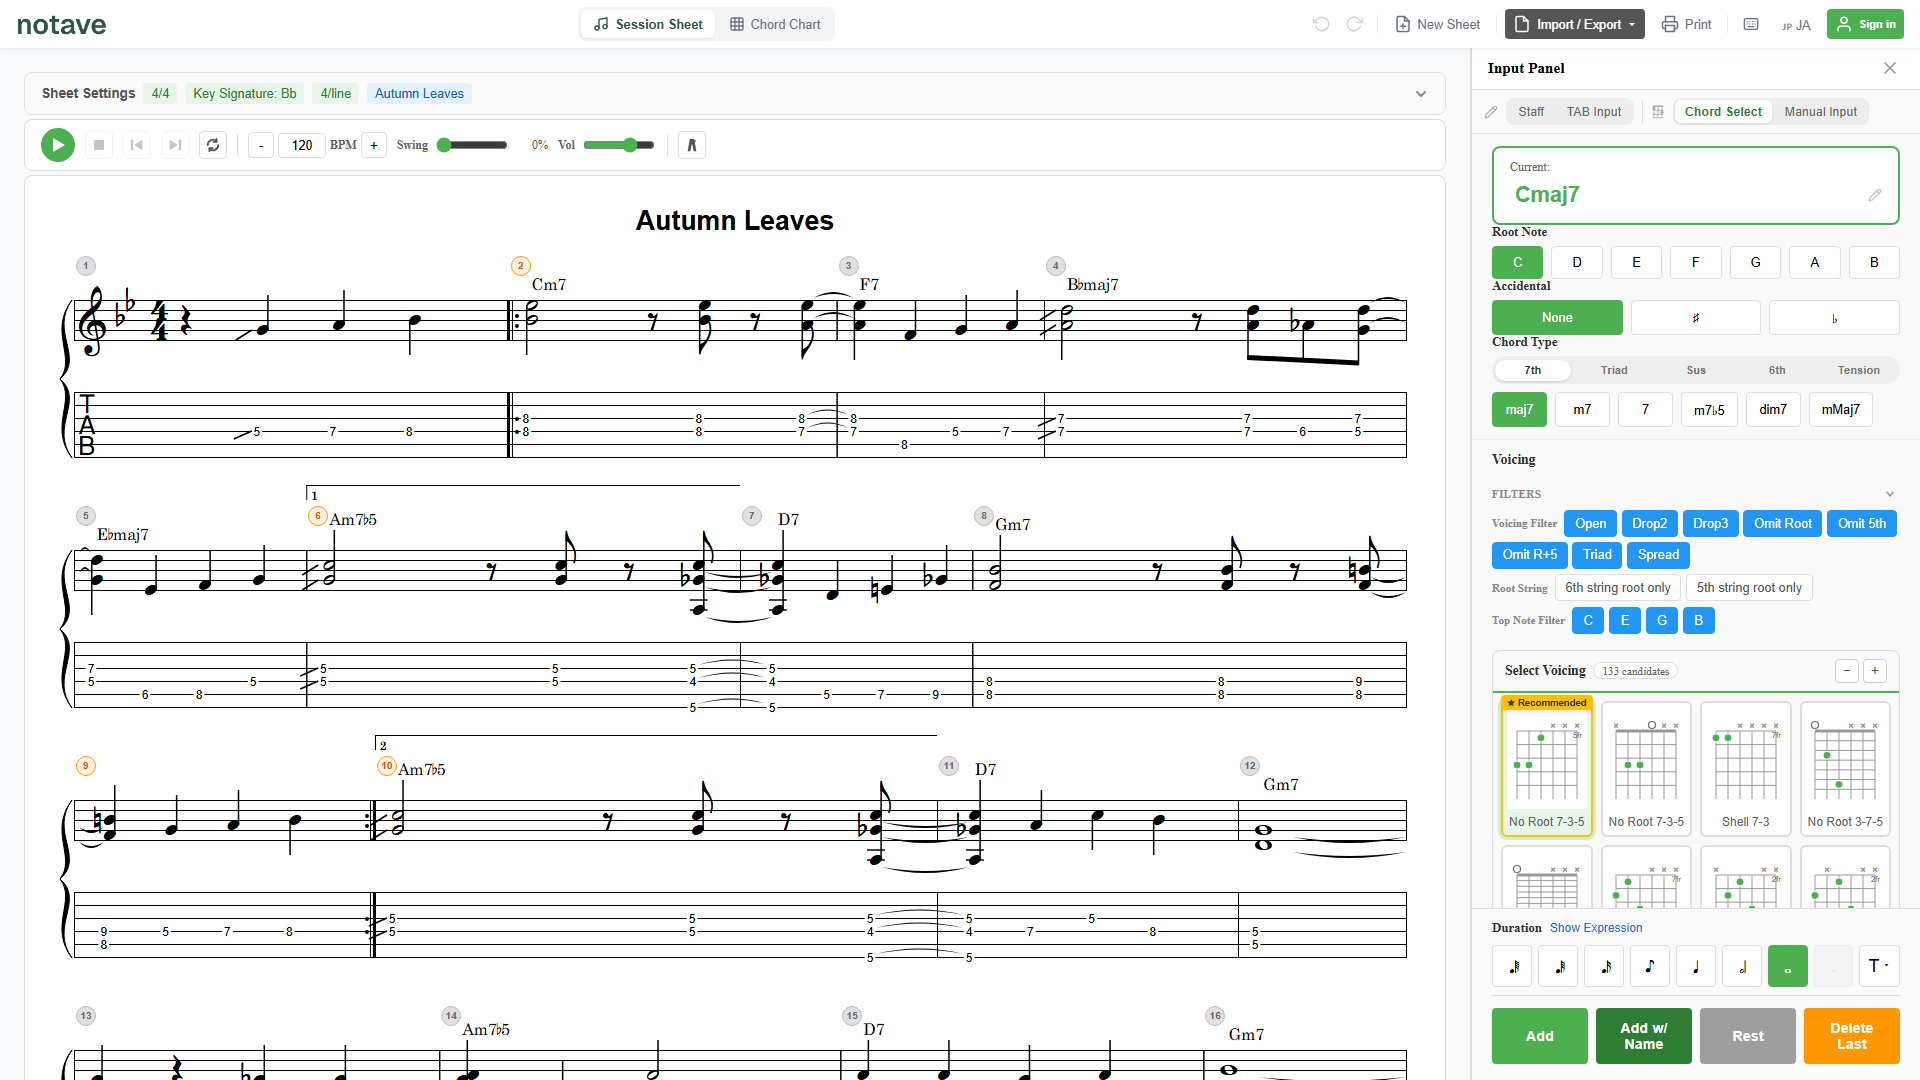
The notave screen is made up of the following blocks:
- Header: view toggle (Session Sheet / Chord Chart), undo/redo, new sheet, File (import/export), print, keyboard shortcuts, feedback, language switch, cloud save status (the cloud icon), sign-in (the account menu once signed in)
- Sheet settings bar: shows the current time signature, key signature, measures-per-line, and tuning. Click to open/close the settings panel
- Playback bar: play/stop, previous/next measure, playback position, loop, BPM, swing, volume, guitar tone, metronome, count-in, backing band, backing audio (an audio file or YouTube video that plays with the sheet)
- Sheet area: staff and TAB. Clicking a measure number opens that measure’s settings panel; the right-click menu (long-press on a phone) offers re-fingering and one-at-a-time changes to the measure’s symbols (see “5. Measure Operations”)
- Input panel: on the right (a bottom sheet on mobile). Switches between four modes: Staff, TAB Input, Voicing Select, Manual Input
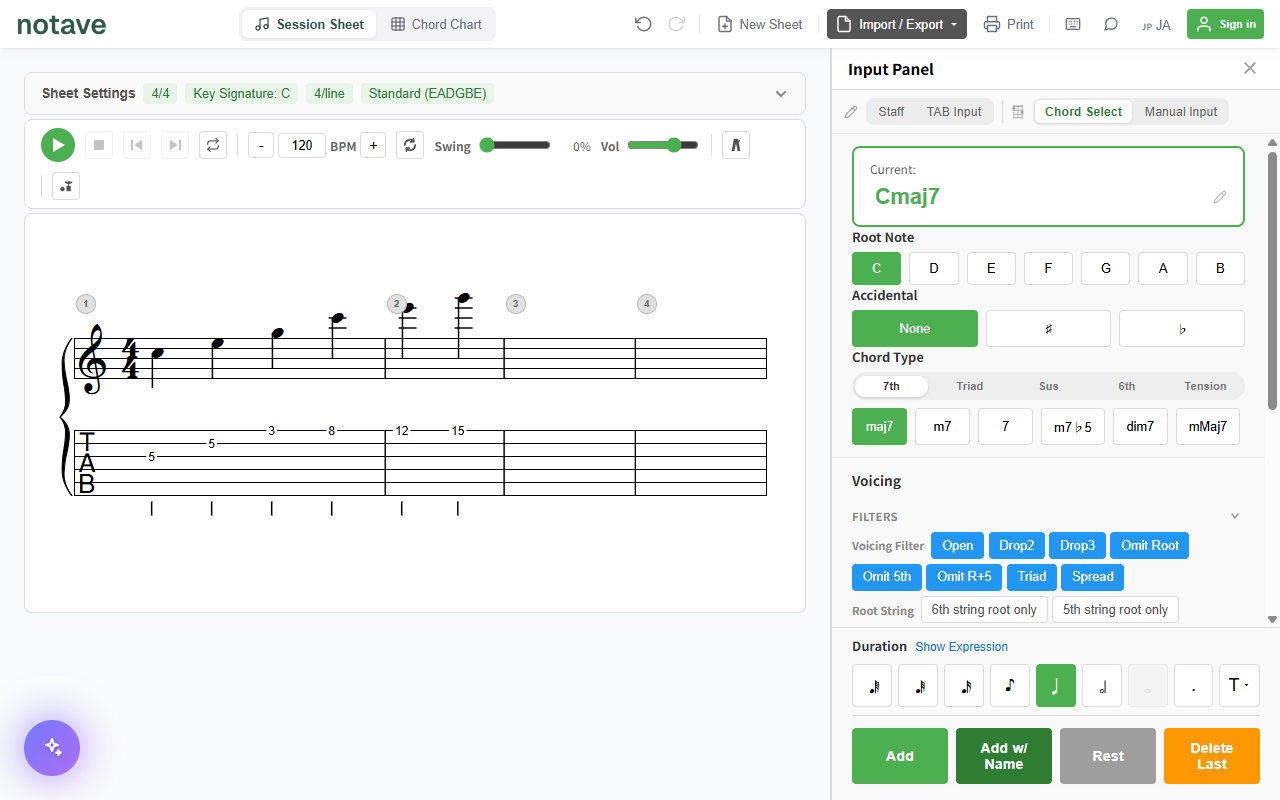
2. Sheet Settings
Clicking the sheet settings bar opens a panel with a “Sheet” tab and a “Tuning” tab.
2.1 Sheet tab
| Field | Description |
|---|---|
| Sheet title | Free-text title for the sheet |
| Time signature | 2/4, 3/4, 4/4, 5/4, 6/8, 7/8, 9/8, 12/8 (the sheet’s default; to change it for a single measure, see “5. Measure Operations”) |
| Key signature | Select from a list of major/minor keys |
| Transpose | “Transpose…” next to the key buttons opens a dialog that transposes the whole sheet in semitone steps (see 2.2) |
| Measures per line | 1–6 |
| Equalize measure width | When on, all measures in a line get equal width regardless of note density (a measure that needs more room still gets the space it requires) |
| Show intervals | Shows each note’s interval from the chord root, between the staff and TAB |
| Measure Numbers | Off / Start of each line / Every measure (off by default). Applies to print, image and video export and the share page. “Start of each line” leaves measure 1 unnumbered. The round numbers in the editor are for selecting measures and always stay, whatever this is set to |
| Two-voice input (melody + accompaniment) | For solo-guitar (chord-melody) writing. Enables a voice-switch UI; melody notes are entered as the up-stem voice |
| Open input panel on edit | When the input panel is closed, clicking the staff or TAB auto-opens the matching input panel (on by default) |
2.2 Transpose
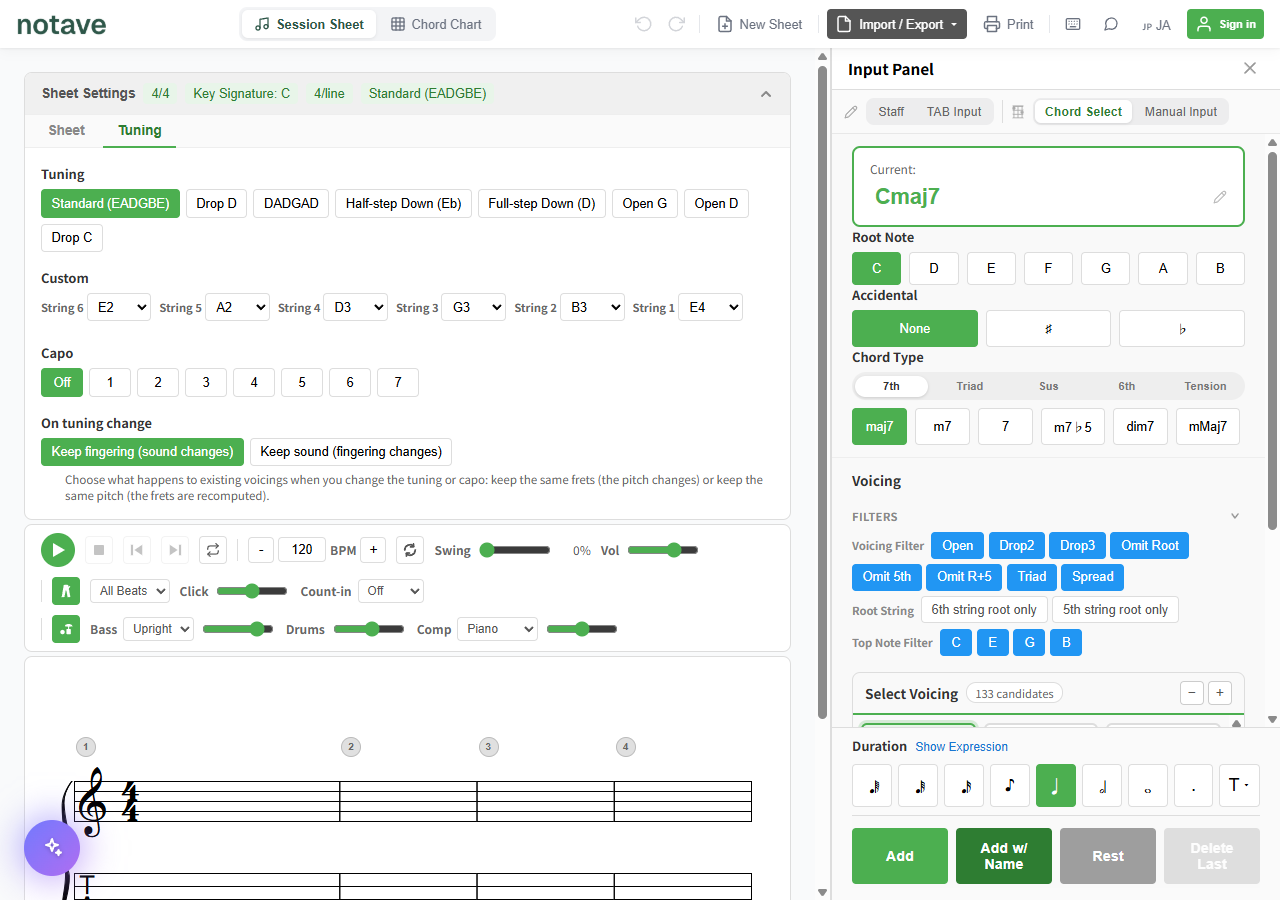
Clicking “Transpose…” next to the key signature buttons opens the Transpose dialog. Pick an amount from −11 to +11 semitones and press “Transpose” to shift every note, chord symbol (both events and the chord lane), and the key signature of the whole sheet at once. The dialog previews the resulting key (e.g. Key: C → D), and key/chord spellings follow the target key’s sharp/flat family.
- Each note shifts frets on its own string. When a shape would leave the fretboard, chord-derived voicings are re-voiced to the closest shape of the transposed chord (a Drop 2 stays a Drop 2 where possible), while single notes move to a nearby string
- If even one note would fall outside the instrument’s range, the transpose is not applied and an error is shown (try a different amount or review the tuning)
- The operation is not covered by Undo (Ctrl+Z). Transposing back by the same amount restores the key and chord names, but not the voicings of chords whose shapes changed — to keep the original, save the file before transposing
2.3 Tuning tab
| Field | Description |
|---|---|
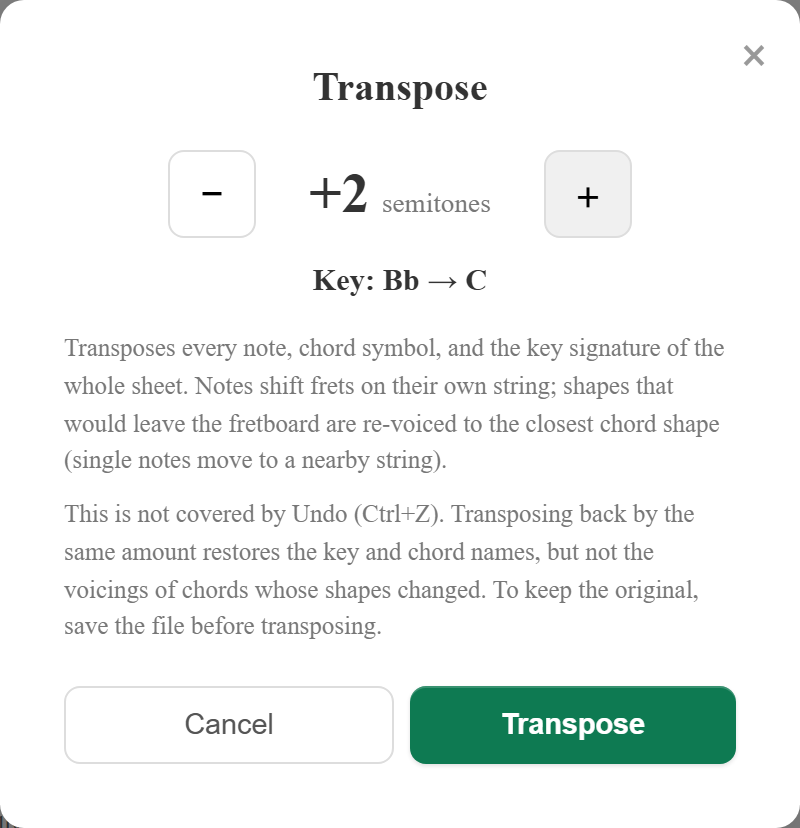
| Presets | Standard (EADGBE), Drop D, DADGAD, Half-step Down (Eb), Full-step Down (D), Open G, Open D, Drop C |
| Custom | Set each string (6 through 1, or 4/5 for bass) to an individual pitch |
| Capo | Off, or fret 1–7 |
| On tuning change | “Keep fingering (sound changes)” keeps the fret positions as-is; “Keep sound (fingering changes)” recomputes frets to preserve pitch. Determines how existing voicings are handled when tuning or capo changes |
3. New Sheet
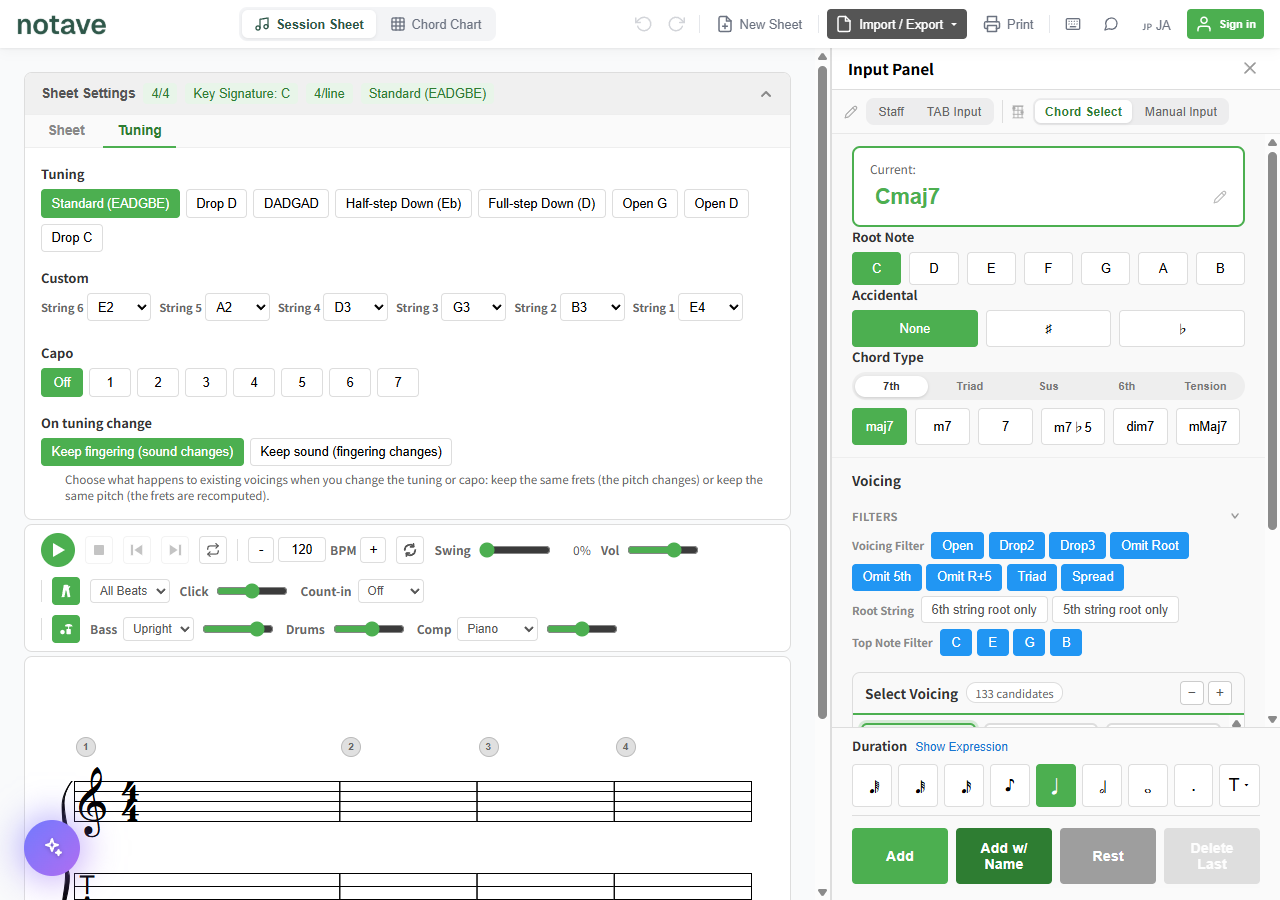
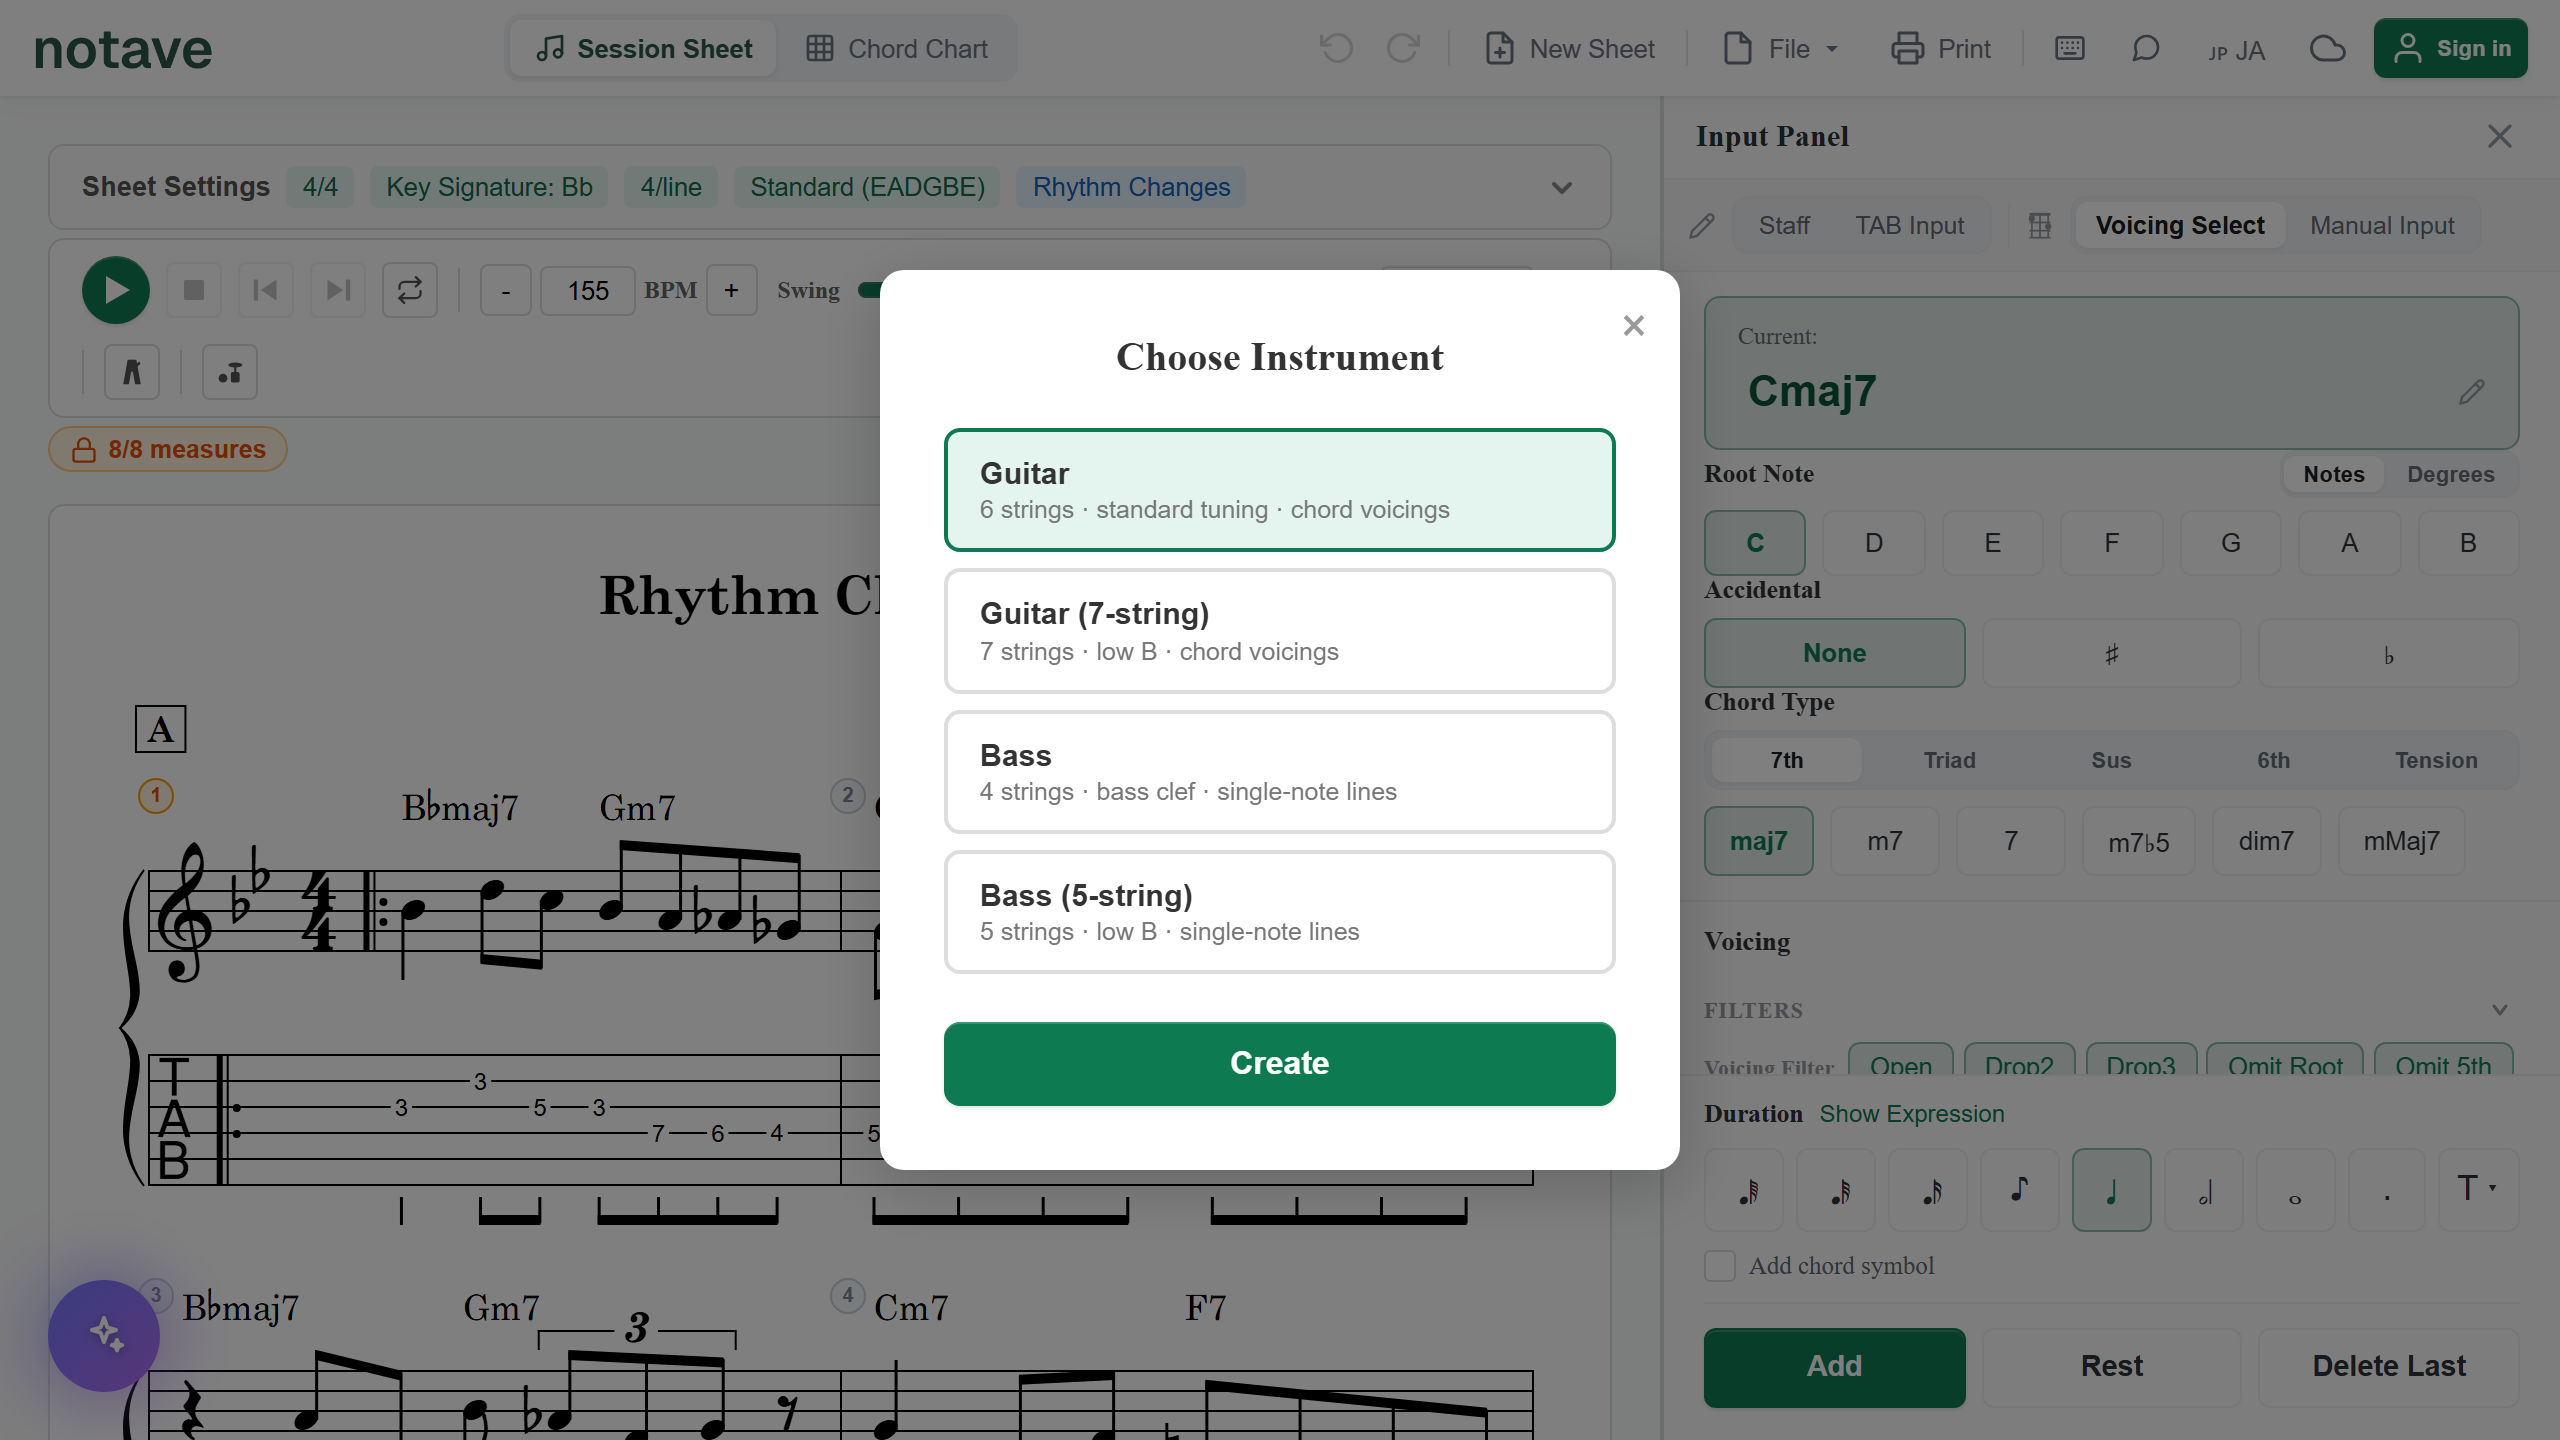
“New Sheet” in the header opens an instrument picker. Choose from Guitar (6-string, standard tuning), Guitar (7-string, low B), Bass (4-string), or Bass (5-string, low B), then click “Create” to start a new sheet.
4. Input Panel
The input panel’s top tabs switch between the note-entry modes (Staff / TAB Input) and the chord (voicing) modes (Voicing Select / Manual Input).
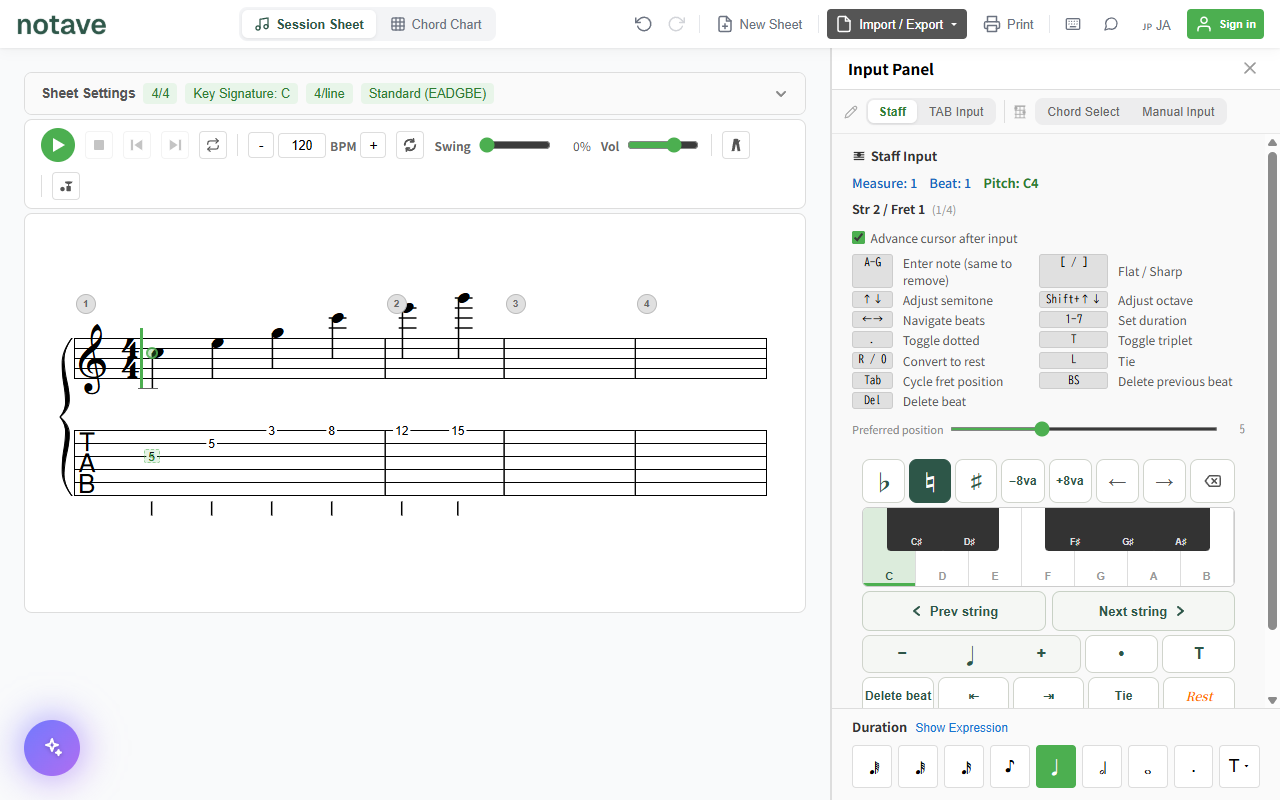
4.1 Staff mode
Clicking the staff places the cursor at that beat.
| Action | Key |
|---|---|
| Enter note name (same note removes it) | A–G |
| Flat / sharp | [ / ] |
| Adjust by semitone | ↑ ↓ |
| Adjust by octave | Shift + ↑ ↓ |
| Move between beats | ← → |
| Move note earlier/later (slide or swap) | Alt + ← → |
| Set duration | 1–7 |
| Convert to rest | 0 |
| Tie | L |
| Move note to other voice | Shift + U |
| Cycle fret position | Tab |
4.2 TAB Input mode
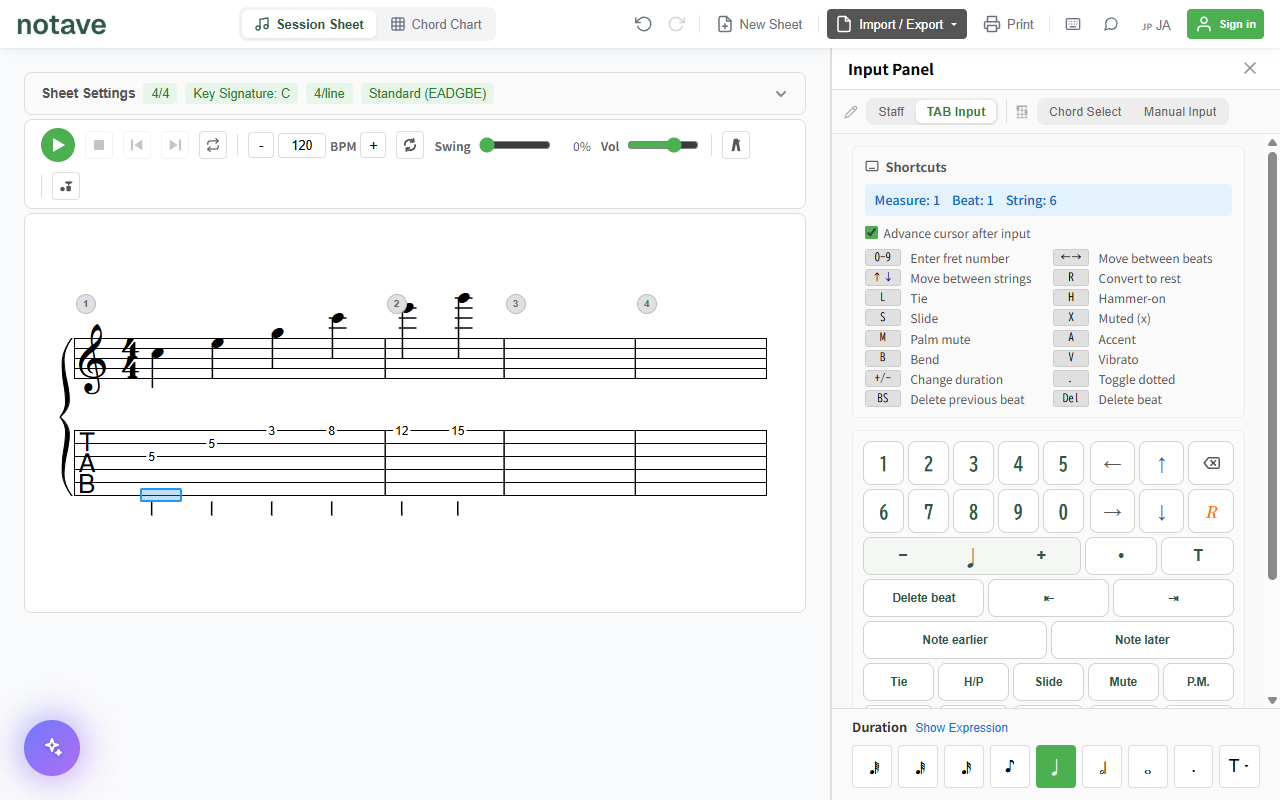
Clicking the TAB switches to entry driven by fret numbers.
| Action | Key |
|---|---|
| Enter fret number | 0–9 |
| Move between beats | ← → |
| Move between strings | ↑ ↓ |
| Jump to next/previous measure | Ctrl + ← → |
| Move note to adjacent string | Alt + ↑ ↓ |
| Move note earlier/later (slide or swap) | Alt + ← → |
| Transpose note (semitone) | Shift + ↑ ↓ |
| Tie | L |
| Hammer-on | H |
| Pull-off | P |
| Slide | S |
| Ghost (dead) note | X |
| Palm mute | M |
| Accent | A |
| Cycle bend | B |
| Bend & release | Shift + B |
| Glissando in | G |
| Glissando out | Shift + G |
| Vibrato | V |
| Grace-note input mode | O |
| Move note to other voice | Shift + U |
| Convert to rest | R |
| Erase note on string | Backspace |
| Delete beat | Del |
| Confirm edit | Enter |
| Re-finger the bar (each press tries another) | Alt + R (previous candidate: Alt + Shift + R) |
The “Re-finger bar N” button at the top of the panel reassigns the strings and frets of the cursor’s bar (or the selected bars) to another candidate without changing a single pitch (see “5.1 Re-fingering”).
With grace-note input mode (O) on, the next fret you type is attached to the previous note as a grace note. A wider set of techniques (tapping, slap/pop, harmonics, tremolo, whammy bar, and more) lives in the Expression panel — see “4.5 Expression (techniques).”
A tie (L) joins two notes of the same pitch, and auto-ties when the pitch matches the previous note. Trying to tie two different pitches with L shows a hint to use a slur instead.
4.3 Voicing Select mode
Picks a voicing (fingering) from a chord name.
- Choose a root note (C–B, ♯/♭) and a chord type (7th / Triad / Sus / 6th / Tension category, then the specific quality). A Notes / Degrees toggle switches how the root is entered. In Degrees mode, buttons I–VII pick a diatonic note (root + accidental) relative to the sheet’s key, so the same degree progression stays easy to enter when the key changes
- Candidates appear under “Select Voicing.” Narrow them with filters — Open, Drop2, Drop3, Omit Root, Omit 5th, Omit R+5, Triad, Spread — plus root string (6th-string-root-only / 5th-string-root-only) and top note
- Candidates that connect smoothly to the surrounding chords (smooth voice leading) are marked “Recommended”
- Click a candidate to add it, or use “Add w/ Name” to add it with the chord name displayed
The chord-name text field also accepts Roman numerals (degrees). Relative to the key, II resolves to Dm7, V7 to G7, bVII to B♭ (a bare numeral is the diatonic 7th; add a quality or accidental to override).
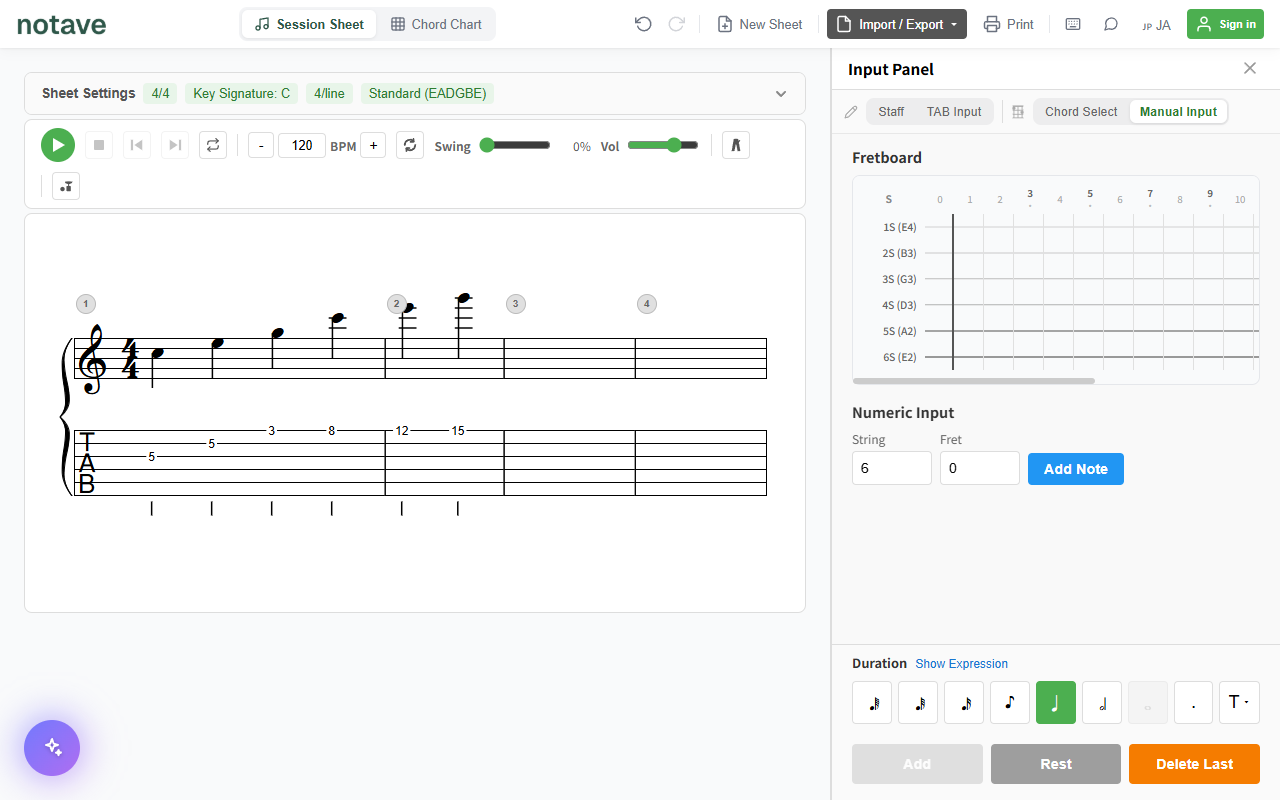
4.4 Manual Input mode
Bypasses automatic suggestions; the fingering is specified directly. Click on the fretboard, or enter values into the “String” and “Fret” number fields and click “Add Note,” to build a shape one note at a time.
4.5 Expression (techniques)
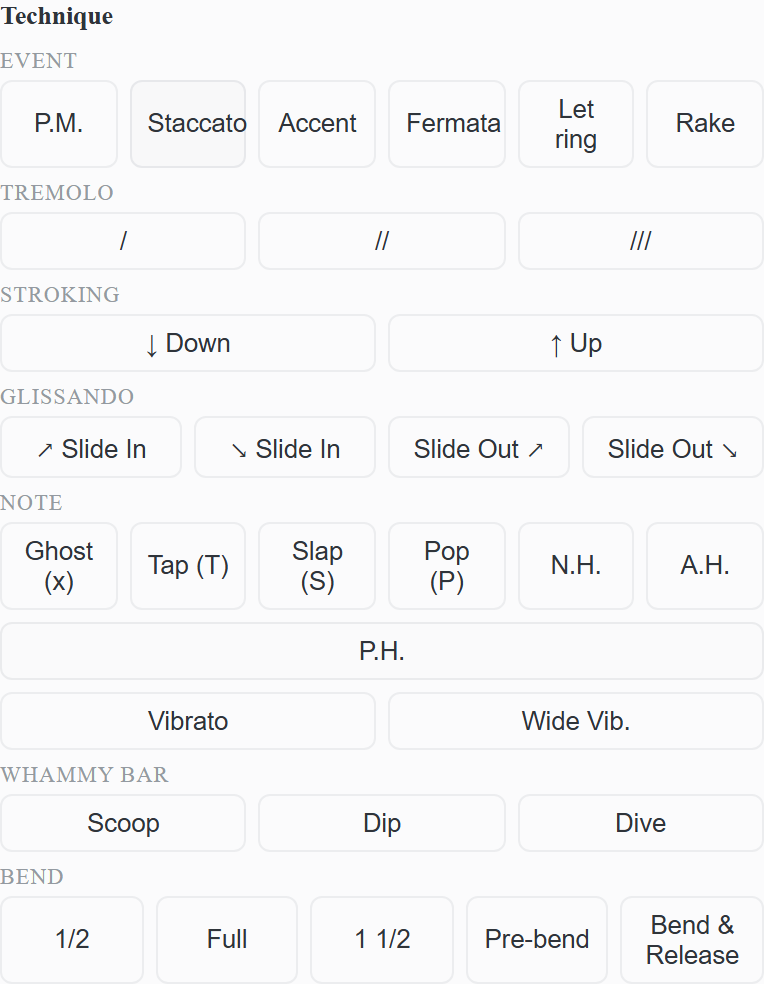
“Show Expression” on the duration row opens the Expression panel. It applies techniques — including ones with no keyboard shortcut — to the note being edited (or the one about to be added) via buttons. Drag the panel’s top edge to resize it.
| Group | Contents |
|---|---|
| Event | Palm mute (P.M.) / Staccato / Accent / Fermata / Let ring / Rake / L.H. slap (bass only; can also sit on a rest) |
| Tremolo | / = 8th, // = 16th, /// = 32nd tremolo picking |
| Stroking | ↓ Down / ↑ Up |
| Glissando | Slide in (↗ / ↘) / Slide out (↗ / ↘) |
| Note | Ghost (x) / Tap / Slap / Pop / Thumb ↓ (T↓) and Thumb ↑ (T↑, bass only) / Natural harmonic (N.H.) / Artificial harmonic (A.H.) / Pinch harmonic (P.H.) |
| Vibrato | Vibrato / Wide vibrato |
| Whammy bar | Scoop / Dip / Dive |
| Bend | 1/2, Full, 1 1/2, plus Pre-bend and Bend & Release |
Ghost is an independent toggle rather than one of the mutually exclusive techniques, so it stacks on slap or pop (slap + ghost = a dead note struck with the thumb). In TAB input it also toggles with X, and it plays back as a damped percussive hit.
The palette is per-instrument: Thumb ↓ / Thumb ↑ and L.H. slap appear only on bass charts, never on guitar ones (the filter applies to the input palette only — techniques already in a chart are drawn, played, and exported on any instrument). Tapping, whammy bar, and the harmonics are mainly guitar techniques. Applied techniques are drawn as symbols on the staff/TAB and carried through to playback, video, and MusicXML export.
5. Measure Operations
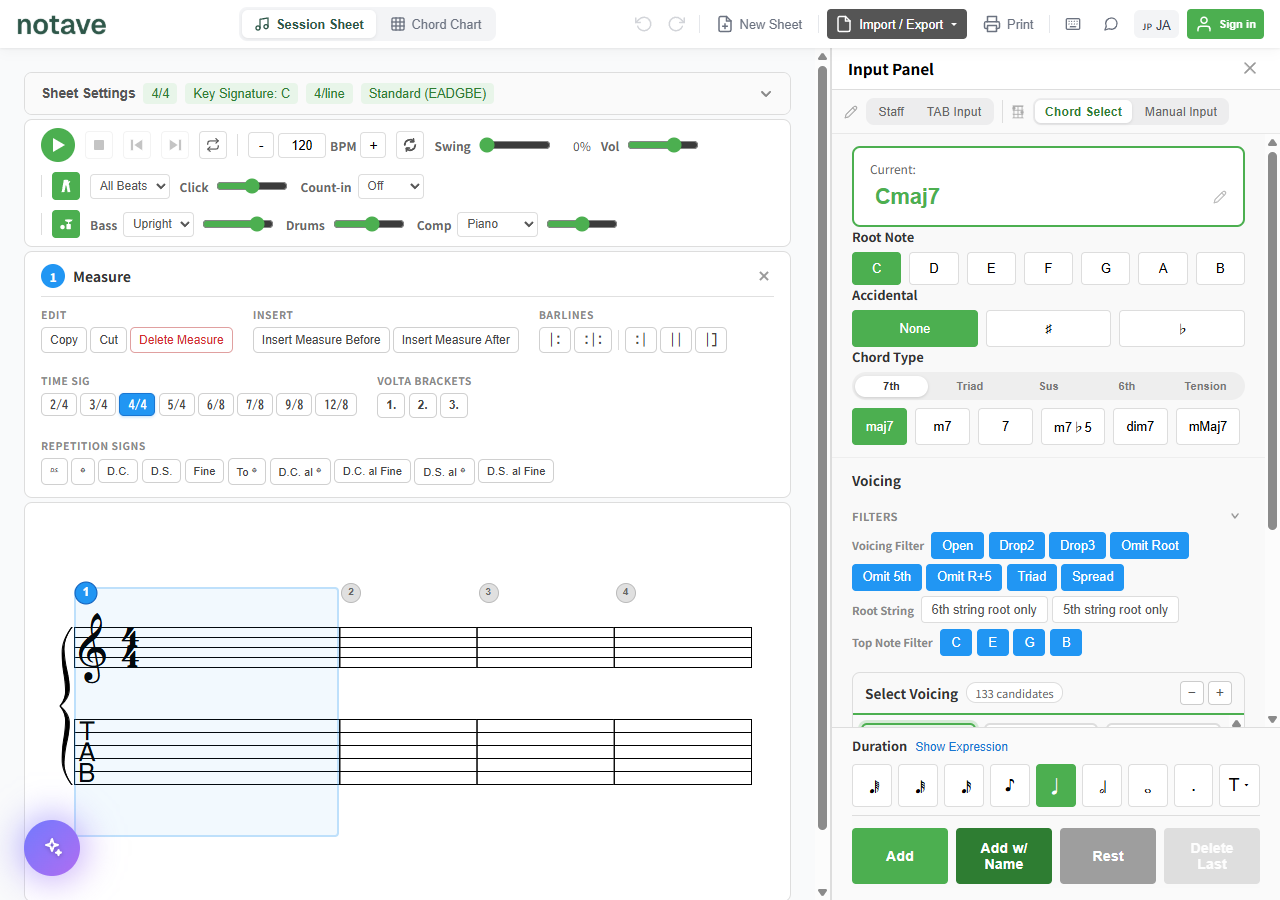
Clicking a measure number (①②③…) above the staff opens a settings panel scoped to that measure. Closing it with × keeps the measure selected.
Right-clicking a measure (long-press on a phone) opens a menu: Measure Settings / Play from measure N / Re-finger / Barline… / Time signature… / Key signature… / Volta… / Repeat signs… / Rehearsal / text…, plus copy, cut, paste, delete and insert. Picking an item with ”…” floats a small chip above the measure holding just that input, so you can change it in place without opening the panel (the volta, repeat-sign and rehearsal/text chips sit below the measure so they don’t hide the symbol being edited).
| Group | Options |
|---|---|
| Fingering | Re-finger (see 5.1) |
| Edit | Copy / Cut / Delete Measure |
| Insert | Insert Measure Before / Insert Measure After |
| Barlines | \|: (repeat start) / :\|: (repeat end + start) / :\| (repeat end) / \|\| (double bar) / \|] (final barline) |
| Time Sig | Override the time signature for this measure only (2/4–12/8) |
| Volta brackets | 1st / 2nd / 3rd ending, for repeat branches |
| Repetition signs | 𝄉 (Segno) / 𝄌 (Coda) / D.C. (Da Capo) / D.S. (Dal Segno) / Fine / To 𝄌 / D.C. al 𝄌 / D.C. al Fine / D.S. al 𝄌 / D.S. al Fine |
| Rehearsal / Text | Set a rehearsal mark (boxed, e.g. A / B / 1, up to 4 chars) and free text above the measure (up to 40 chars). Both render above the staff and travel with share links, saves, and copies |
Among the repetition signs, 𝄉 and 𝄌 place the Segno and Coda markers themselves; the rest (D.C., D.S., Fine, To 𝄌, etc.) are navigation instructions specifying where playback should jump to or end.
5.1 Re-fingering
Right-click a measure (long-press on a phone) and choose “Re-finger”: a chip appears above the measure and the first candidate is applied right away. Each press of ”◀ Re-finger ▶” moves to another fingering of the same notes: the pitches stay, only the strings and frets change. The candidates cycle through “Keep position”, “Low position”, “High position” and “Fewest string crossings”, then return to the original. ▶ is the next candidate (Alt + R), ◀ the previous one (Alt + Shift + R; the keys open the chip too). With several measures selected, the whole range is re-fingered together. The same command is available from “Re-finger bar N” in the TAB Input panel and “Fingering” in the measure settings panel.
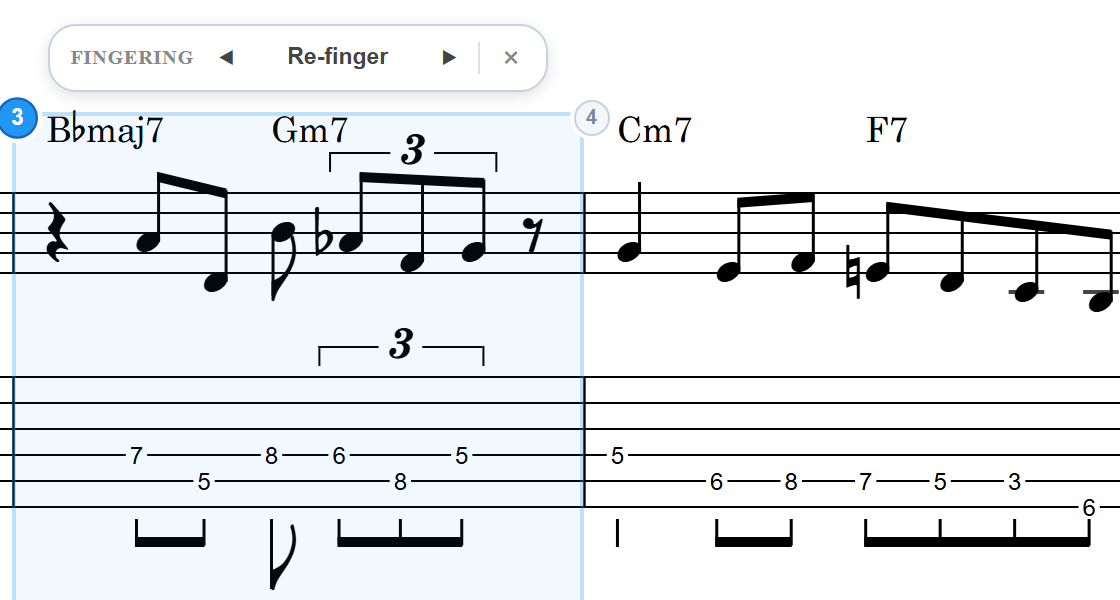
- Chords only move to a shape that holds every note. Rests, ghost notes, harmonics, and pitches no string can produce stay put
- In two-voice sheets (melody + accompaniment), melody and accompaniment never share a string at the same moment
- Each press is one undo step (Ctrl+Z)
6. Playback
6.1 Basic controls
The playback bar has Play/Stop, Previous/Next measure, the playback position, and a loop toggle that repeats the selected measures (or the whole piece if none are selected). The loop region can also be set by typing the start and end measure numbers directly (the matching measures are highlighted).
Starting from the middle
Playback starts from the selected measure (or from the beginning if nothing is selected). You can set the start position in any of these ways:
- Click a measure number on the sheet to select it, then press Play or
Space - Type a measure number into “Position” on the playback bar (typing one during playback jumps to that measure)
- While stopped, press Previous/Next measure (the start position moves one measure at a time)
- Right-click the sheet and choose “Play from measure N”
The Position field shows the current measure during playback, and the start position while stopped.
The Stop button stops playback on the first press. The start position stays where it was, so Play replays the same passage. Pressing it again while stopped sends the start position back to the beginning (measure 1).
6.2 Tempo, swing, volume
BPM is set with -/+ or by typing directly into the field. The Swing slider adjusts the shuffle ratio; the Vol slider adjusts playback volume. “Tone” sets the notated guitar’s timbre — Acoustic, Electric (clean), or Electric (dist); applied techniques are preserved across all tones.
6.3 Metronome
Clicking the metronome icon expands a settings row.
| Field | Options |
|---|---|
| Pattern | All Beats / 2 & 4 / Upbeat |
| Click volume | Slider |
Count-in (Off / 1 Bar / 2 Bars) is always shown next to the metronome icon and is set separately from the metronome’s on/off state. It plays right before wherever playback starts, so it also counts you in when you start from the middle of the sheet. Its length follows the time signature of the starting measure.
6.4 Backing band
Clicking the backing-band icon expands a settings row. It auto-generates bass, drums, and comping (accompaniment) that follow the entered chord progression. On a sheet with no chords, or in the measures before the first chord, only the drums play, in the selected style (bass, comping, and pad come in at the first chord).
First pick a “Style” for the feel — Jazz swing, Neo-soul, Rock, or Pop — which changes the groove and each part’s pattern (neo-soul uses a straight feel, so swing is turned off).
| Part | Options |
|---|---|
| Bass | E.Bass / Upright (volume slider) |
| Drums | Volume slider only |
| Comp | Nylon gtr / Piano / E.Piano / O.D.Gtr (volume slider) |
| Pad | Sustained pad / strings layer (sounds when the style provides one; volume slider) |

6.5 Playing an audio file or YouTube video in sync
The “Backing” button on the playback bar (or “Load backing audio” / “Play a YouTube video with the sheet” in the File menu) opens the backing panel. Attach an audio file (MP3 / WAV / M4A / AAC / FLAC / OGG, up to 30 minutes) or a YouTube URL, and play, pause, bar skips and the loop all carry the backing along. Use it to compare a transcription with the original or to practice over the record.
| Field | Description |
|---|---|
| Bar 1 = clip time X | Anchoring: where in the clip bar 1 of the sheet falls, in seconds (type 25 if the sheet starts at 0:25 of the video). The ±1 / ±0.1 / ±0.01 s buttons fine-tune it. A t= in a YouTube URL is taken as bar 1 |
| Use the current position as bar 1 | Stop the backing on the downbeat you want (scrub the video there) and press it: that time becomes bar 1. Pressing it at the right moment during playback works too |
| Align by waveform | A ±3 s zoom around bar 1 shows the waveform with bar and beat lines at the current tempo and meter, plus a red playhead. Drag the waveform sideways to put the downbeat on the bar line. Click to play from the bar containing that position |
| Backing volume | Volume of the backing only |
| Replace / Remove | Swap in another file / detach the backing |
For YouTube, the video’s audio cannot be read directly, so the waveform is recorded with “Capture waveform from tab audio” (Chrome / Edge: pick this tab and tick “Share tab audio”). While capturing, only the video plays and the sheet stays silent. The recording is kept and restored the next time you open the same video. Synced playback and numeric anchoring work before any waveform is captured. Pressing play on the YouTube player starts the sheet from the bar containing that moment, and pausing or scrubbing the video moves the sheet with it.
- The audio file itself is stored only in your browser. Share links and cloud saves carry just the alignment; on another device, pick the same file again and it comes back
- Video and audio exports do not include the backing
- YouTube playback needs a network connection. Sync is within about 0.1 s

7. notave AI
notave AI ended on September 29, 2026. Sheets made with it remain ordinary sheets; editing, playback, sharing, and cloud storage keep working (announcement).
8. File (import / export)
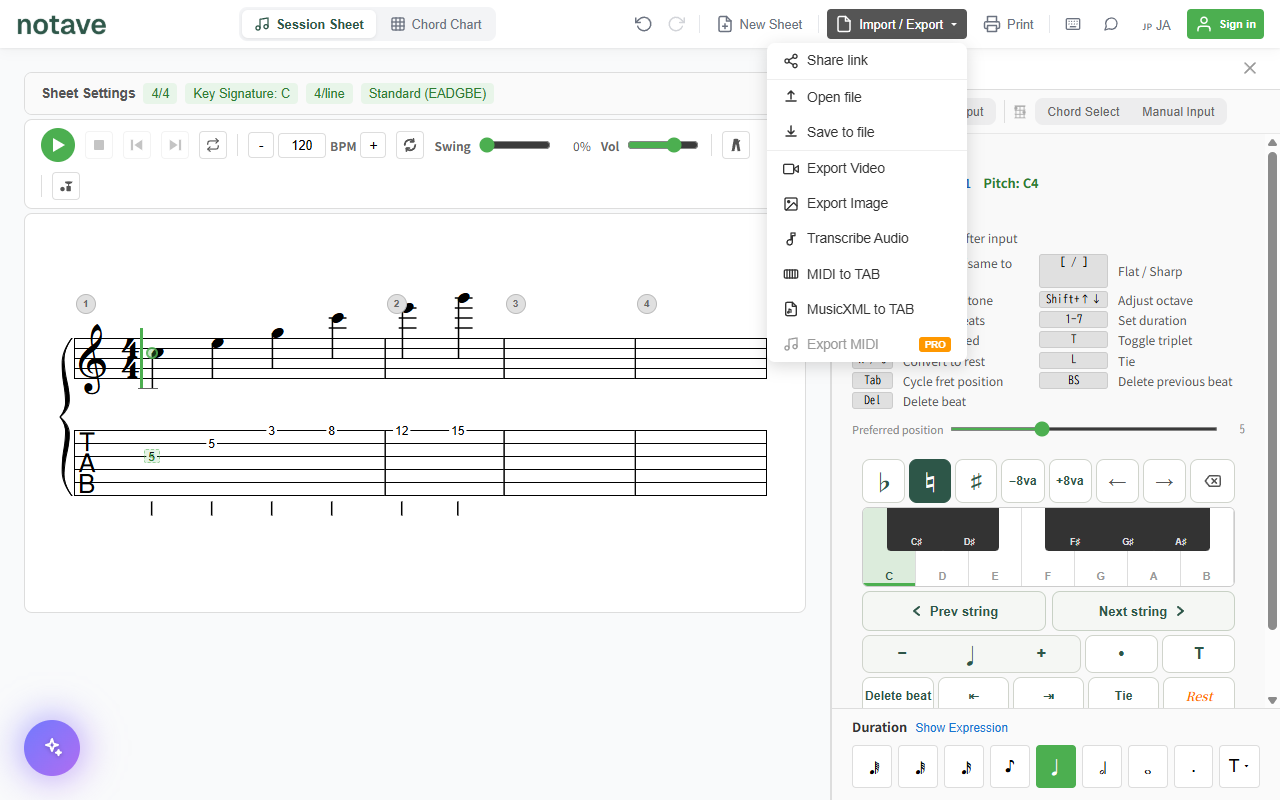
The “File” menu in the header provides:
| Item | Description |
|---|---|
| Share link | Share the sheet via a URL |
| Save to / open from cloud | Store sheets in the cloud and open them from another device (see 8.1) |
| Open file | Load a sheet from a JSON file |
| Save to file | Save the sheet as JSON |
| Load backing audio (plays with the sheet) | Attach an audio file that plays in sync with the sheet (see 6.5) |
| Play a YouTube video with the sheet | Attach a YouTube video that plays in sync with the sheet (see 6.5) |
| Video export | Export an MP4 with the sheet scrolling in sync. Supports YouTube (16:9), Shorts (9:16), and square (1:1), plus overlay strips for play-through videos (Band 16:3 / Band Short); includes guitar audio and metronome clicks. A chroma-key (green screen) background is also available. The sheet’s backing audio (6.5) is not included |
| Image export | Export the sheet as an image |
| MIDI to TAB | Generate a sheet from a MIDI file |
| MusicXML to TAB | Generate a sheet from a MusicXML file |
| MIDI export | Export MIDI for DAW editing. Being opened up to everyone (see “14. What’s free”) |
| Export MusicXML (with TAB) | Export MusicXML including TAB string/fret data, ready to open in notation software like MuseScore. Being opened up to everyone |
Video and print exports currently include a watermark (watermark-free export is being opened up to everyone).
8.1 Save to / open from cloud
Sheets normally live in your browser. Sign in and you can also store them in the cloud and open them from another device. Choosing “Save to / open from cloud” opens the Saved sheets dialog (if you are signed out, it prompts you to sign in first).
Saving
- Save as new — store the sheet you are editing as a new cloud sheet
- Overwrite “(title)” — shown when you are editing a sheet you opened from the cloud; updates that same sheet
Starting a new sheet, importing a share link, or opening a JSON file clears the link to the cloud sheet. From then on a save creates a new sheet, so nothing is overwritten by accident.
The cloud icon in the header shows the save status: an up arrow when there are unsaved changes, a check mark once the sheet is saved to the cloud. Click it (or press Ctrl + S) to save. A sheet you opened from the cloud is overwritten in place; otherwise the Saved sheets dialog opens.
The list
Each row shows the title, measure count, and last-updated time, with Open, Rename, and Delete actions (delete asks for confirmation). Once you have 8 or more sheets, a title search box appears. The dialog header shows how many slots you have used out of your limit.
If the sheet you are editing has unsaved changes, opening a different one asks whether to discard them.
Limits and read-only sheets
| Limit | |
|---|---|
| Sheets stored | 3 |
| Length of a stored sheet | up to 100 measures each |
A sheet longer than the limit (over 100 measures) becomes read-only: it can be viewed, played back, and exported, but not edited or saved. The limits are being raised step by step (see “14. What’s free”).
9. Print
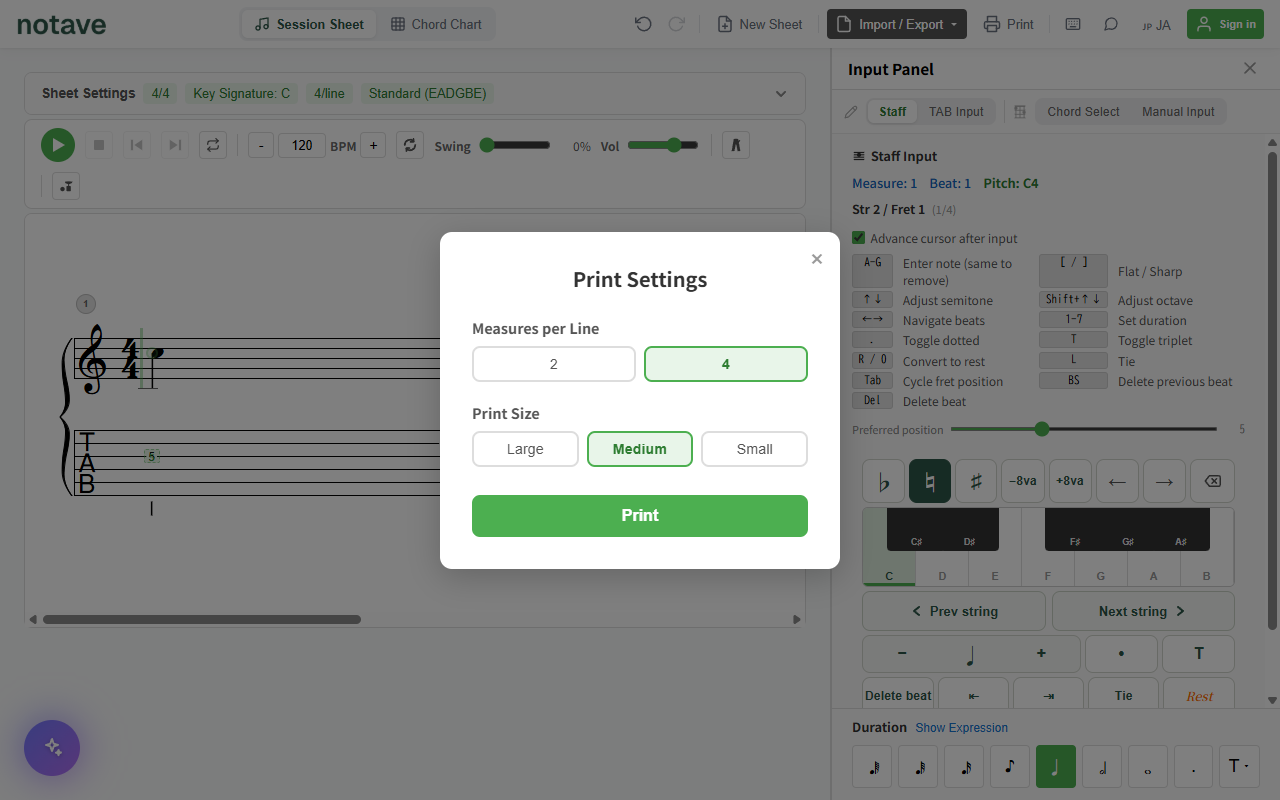
“Print” in the header lets you set measures-per-line (2 or 4) and print size (Large/Medium/Small) before printing to PDF.
10. View toggle: Session Sheet / Chord Chart
The toggle at the top-left of the header switches the sheet’s display format.
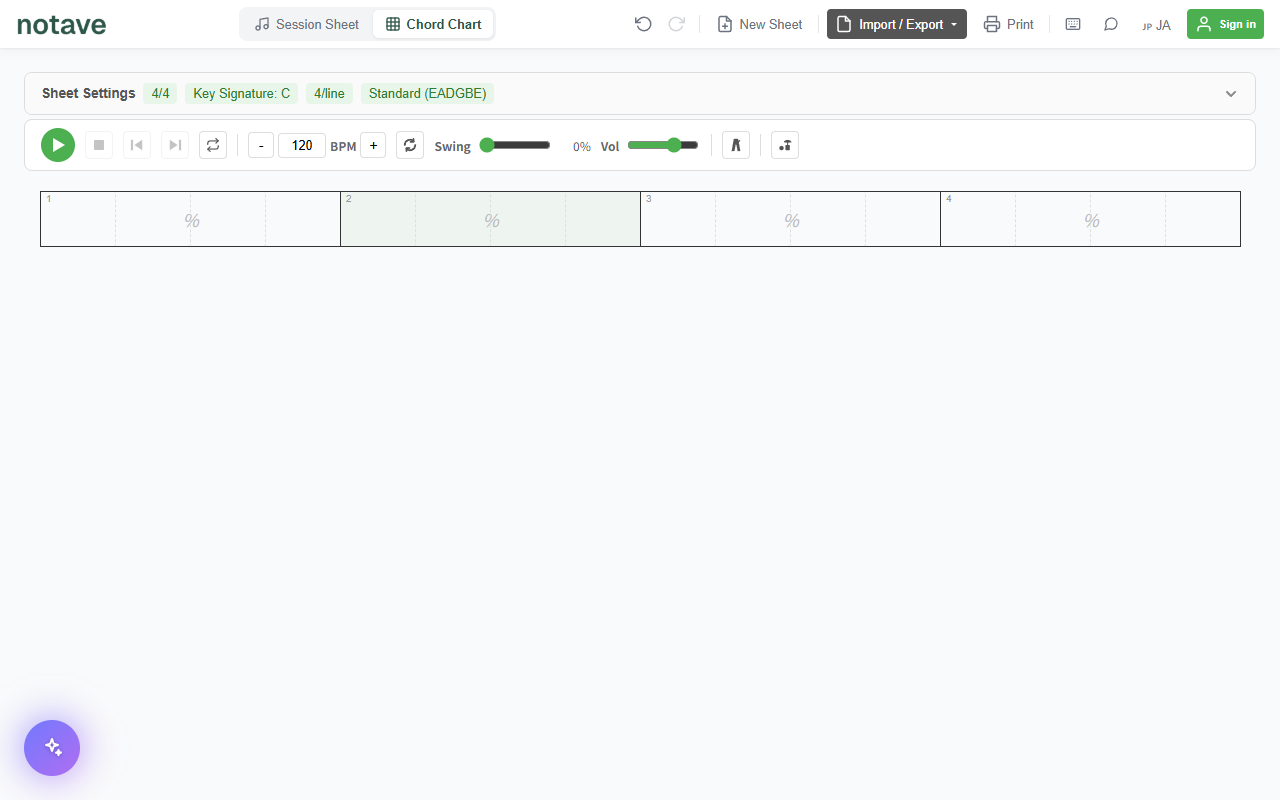
- Session Sheet: the standard view, showing staff and TAB together
- Chord Chart: hides TAB and shows only the chord progression, for viewing the whole song’s changes at a glance
11. Mobile
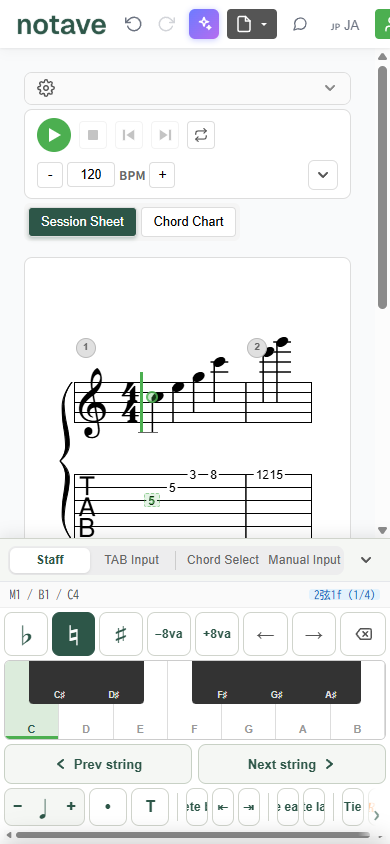
notave is responsive and works from a phone browser. The input panel appears as a bottom sheet, with tabs to switch between Staff, TAB Input, Voicing Select, and Manual Input.
12. Keyboard Shortcuts Reference
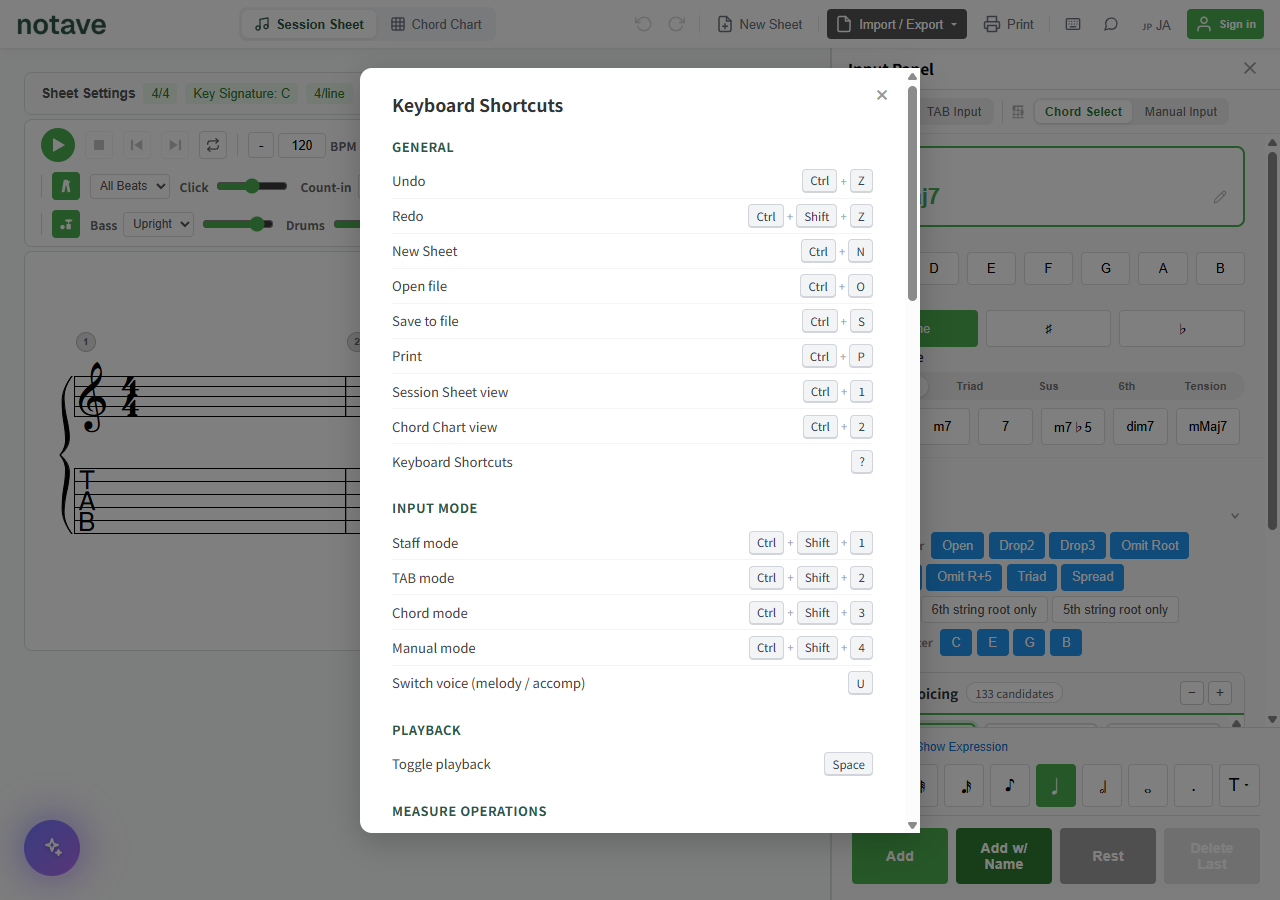
Shortcuts specific to each input mode are listed in the tables under “4. Input Panel.” Below are the global shortcuts.
General
| Action | Key |
|---|---|
| Undo | Ctrl + Z |
| Redo | Ctrl + Shift + Z |
| New Sheet | Ctrl + N |
| Open file | Ctrl + O |
| Save to cloud (opens the Saved sheets dialog if the sheet isn’t a cloud sheet yet) | Ctrl + S |
| Ctrl + P | |
| Session Sheet view | Ctrl + 1 |
| Chord Chart view | Ctrl + 2 |
| Keyboard Shortcuts | ? |
Input mode
| Action | Key |
|---|---|
| Staff mode | Ctrl + Shift + 1 |
| TAB mode | Ctrl + Shift + 2 |
| Chord mode | Ctrl + Shift + 3 |
| Manual mode | Ctrl + Shift + 4 |
| Switch voice (melody/accompaniment) | U |
Playback
| Action | Key |
|---|---|
| Play / pause (from the selected measure) | Space |
Measure operations
| Action | Key |
|---|---|
| Copy measures | Ctrl + C |
| Cut measures | Ctrl + X |
| Paste measures | Ctrl + V |
| Delete measures | Del / Backspace |
| Re-finger the selected bars (each press tries another) | Alt + R |
| Back to the previous fingering candidate | Alt + Shift + R |
Editing
| Action | Key |
|---|---|
| Exit edit mode / Deselect | Escape |
| Navigate events | ← → |
Duration (edit mode)
| Action | Key |
|---|---|
| Set duration (whole–64th) | 7 6 5 4 3 2 1 |
| Shorten duration | + / = |
| Lengthen duration | - |
| Toggle dotted | . |
| Toggle triplet | T |
| Toggle 5/6/7-tuplet | Shift + 5/6/7 |
13. Mic input (TAB Input mode)
The TAB Input panel includes a “Mic Input” section at the bottom. It listens to audio from the microphone and estimates the fret/string being played, entering the corresponding notes once enabled (see the panel’s “How it works” link for details).
14. What’s free
notave is free to use. The paid Pro plan closed to new subscriptions on September 29, 2026, and the features that used to be Pro-only are being opened up to everyone step by step. The current status is on the notave page.
| Feature | Currently |
|---|---|
| Measures per sheet | Up to 100 (8 when signed out) |
| Cloud storage | 3 sheets |
| Video export | Watermarked |
| Print export | Watermarked |
| MIDI export | Being opened up |
| MusicXML export (with TAB) | Being opened up |
The measure cap depends on whether you are signed in: a signed-out visitor gets 8 measures per sheet, and signing in (free) raises that to 100 — enough for a standard with an intro and ending, or two full choruses.
The 300-measure ceiling is a system-wide limit; no sheet can exceed it. A sheet past the limit becomes read-only (see “8.1 Save to / open from cloud”).
If you subscribed to Pro, you keep the Pro features after your billing period ends.
15. Announcement emails
You can choose whether to receive notave announcements (service changes and new features) by email. They are sent only if you say yes, and you can change the setting at any time.
| When | What to do |
|---|---|
| Signing in | Tick “Send me notave announcements by email” in the sign-in dialog (optional; off by default) |
| After signing in | Toggle “Announcement emails” in the account menu in the header |
If you haven’t answered yet, the editor shows a one-line prompt asking whether you want them. Choosing “Yes, send them” or “No thanks” records your answer; closing it with × brings it back later.
Related: Create Guitar TAB in Your Browser for Free (feature overview)