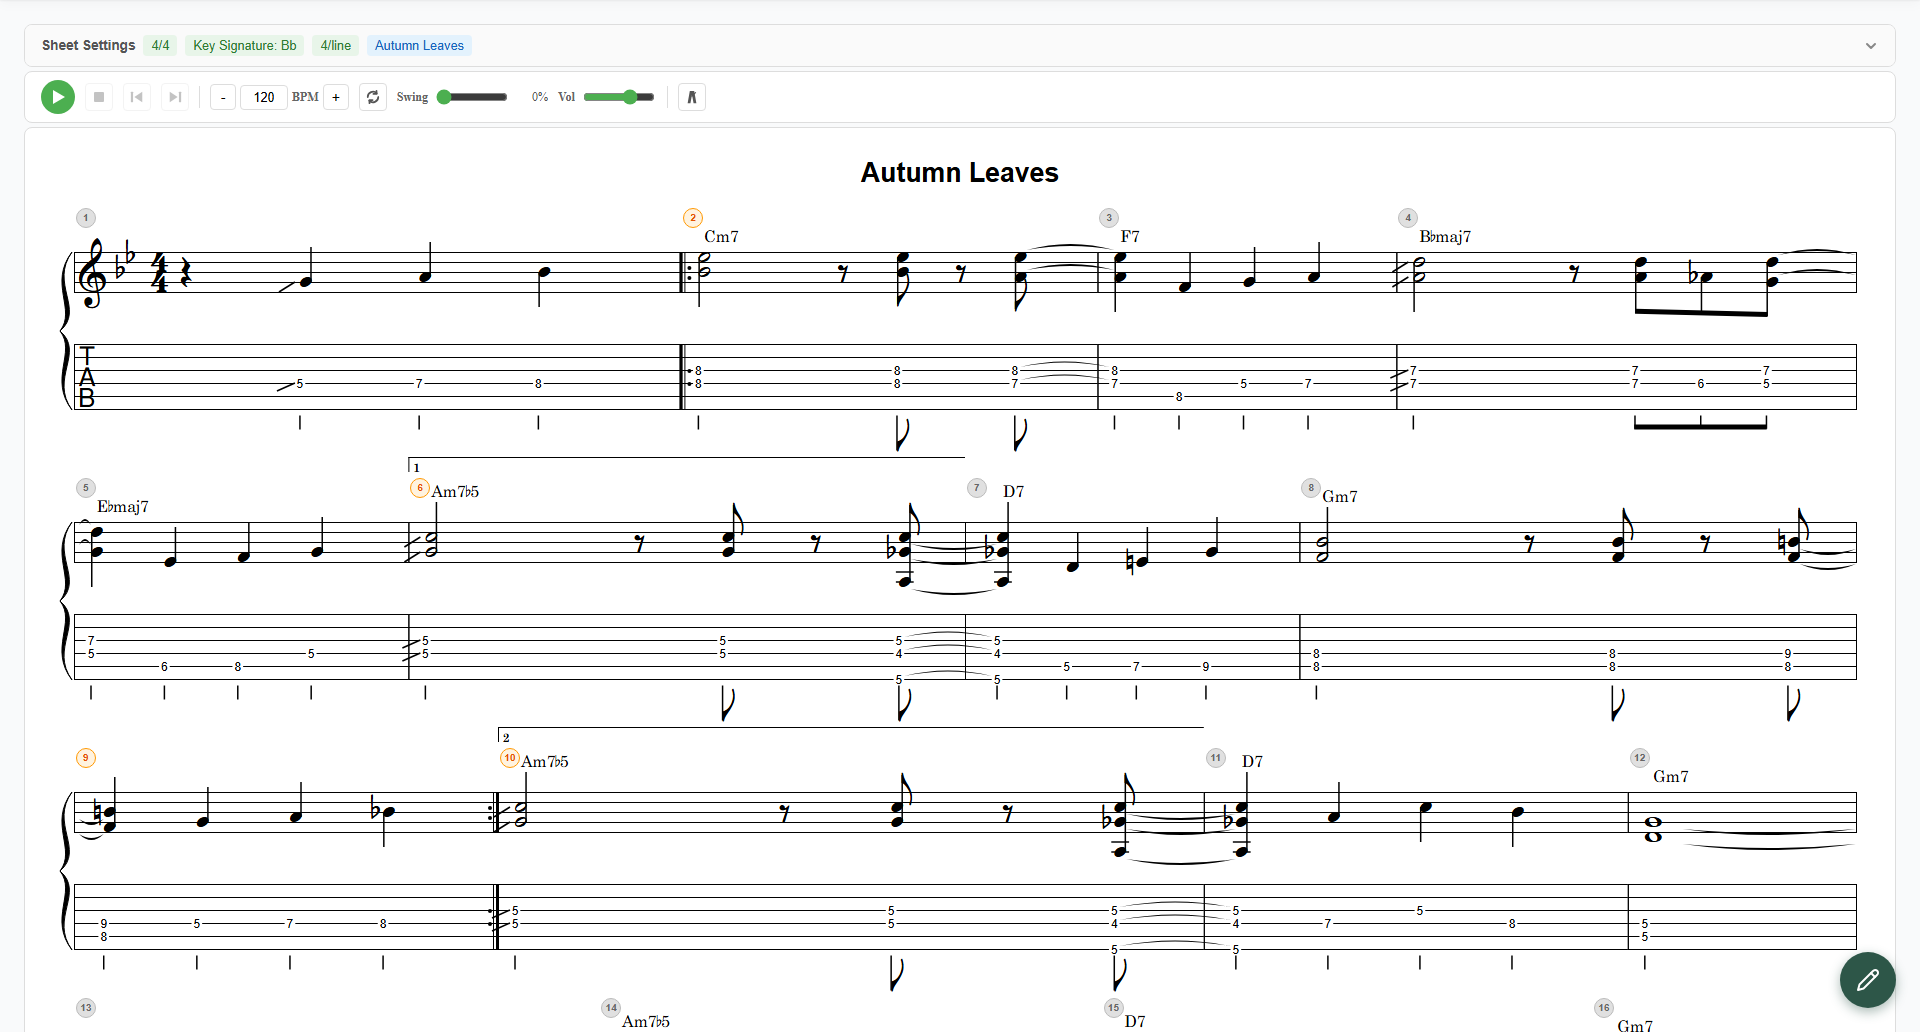
“I want Em7 up high.” “Which fingering connects smoothly to the chords around it?” — Chord Select mode exists to let notave answer these questions.
Pick a root note and a chord type, and a list of theory-based voicing candidates (fingerings) appears. You don’t have to work out fret numbers yourself. This article walks through the input panel one part at a time.
Chord Select lives in the “Chord Assist” group of the mode tabs. It’s hidden when you’ve selected bass (a single-note instrument). For the big picture, see the four input modes.
1. Choose the chord (three ways)
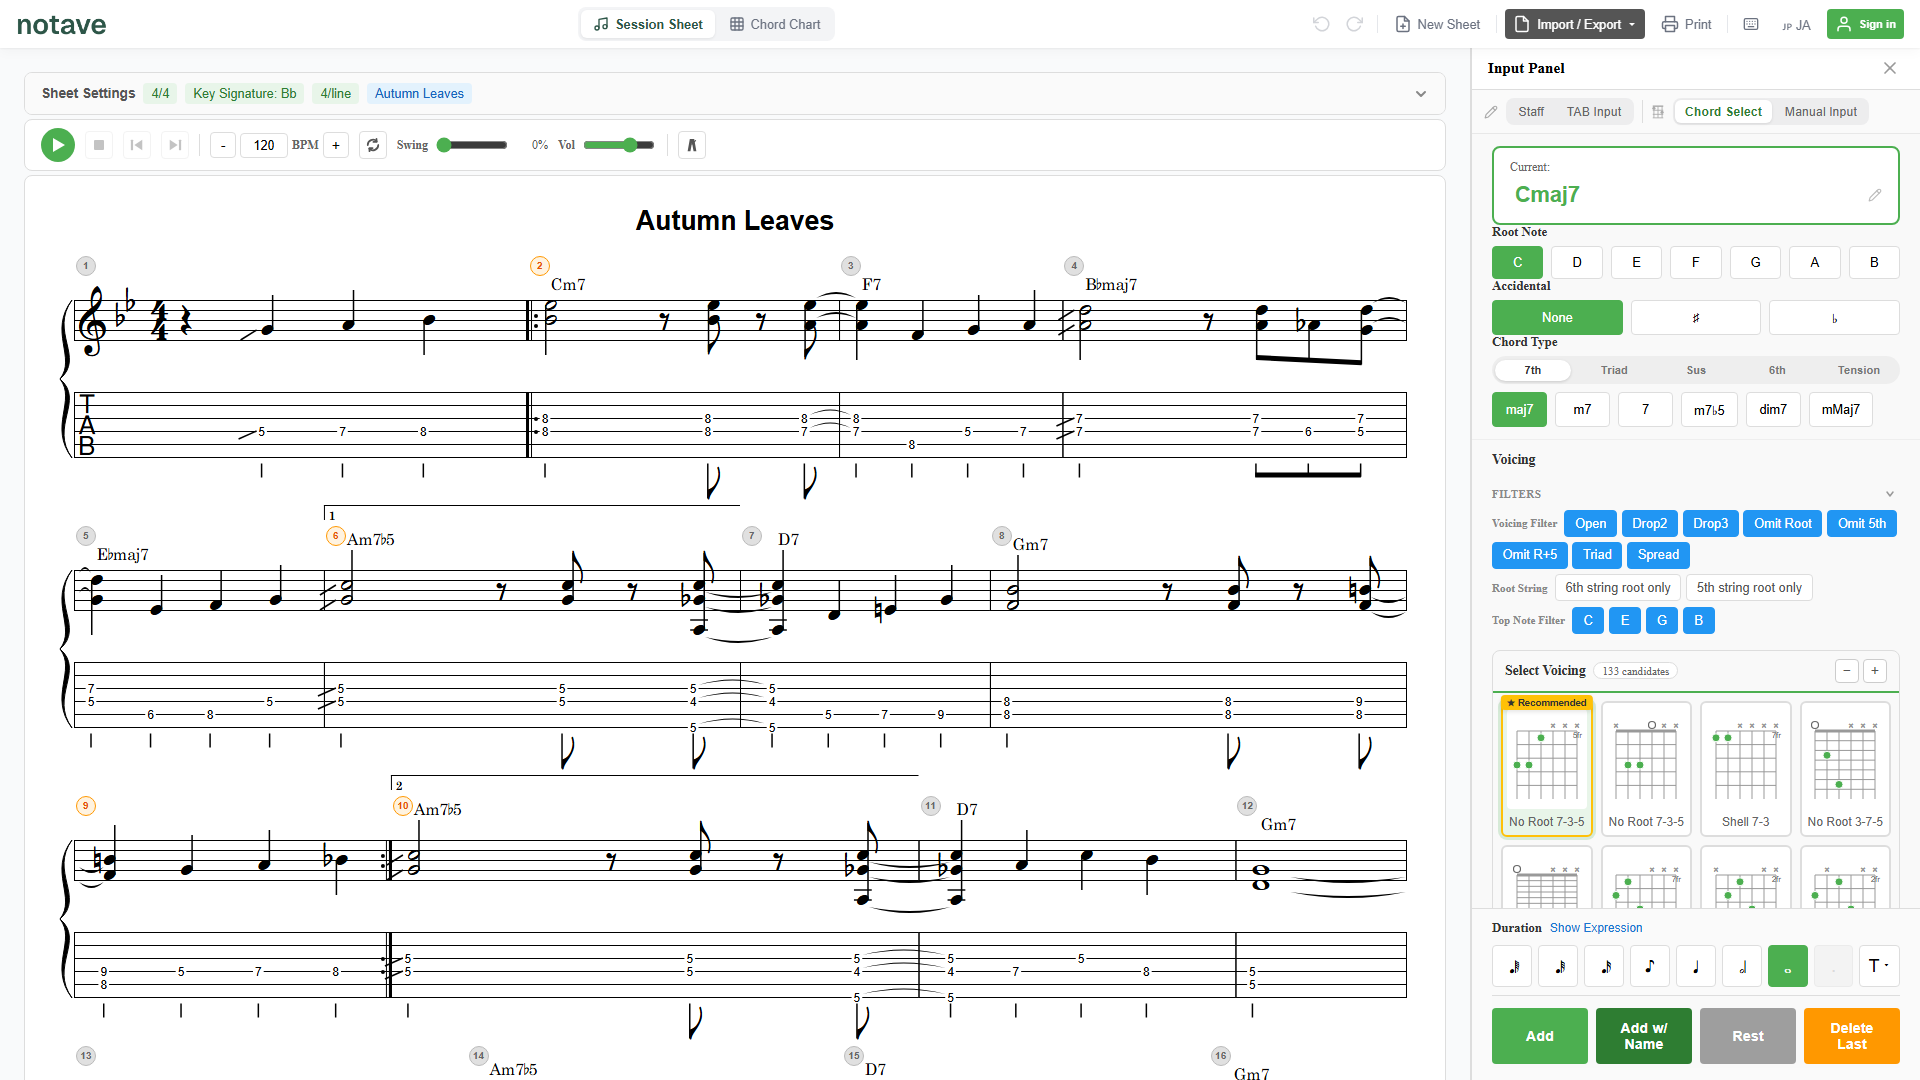
At the top of the input panel, you specify the chord you’re about to place. There are three ways to do it — use whichever you like.
By buttons: Root Note → Accidental → Chord Type
The most basic route is the buttons.
- Root Note: choose from
C D E F G A B. - Accidental:
None / ♯ / ♭. Press the active one again to clear it. - Chord Type: switch category tabs, then pick a type inside.
- 7th: maj7, m7, 7, m7♭5, dim7, mMaj7
- Triad: M, m, dim, aug
- Sus: sus4, sus2, 7sus4, 7♭9sus4
- 6th: 6, m6, 69, m69
- Tension (Pro plan): 9, maj9, m9, 11, 13, 7♭9, 7♯9, 7♯11, alt7, and more
Tap “Root → Accidental → Type” and even a chord like A♭maj7 is specified in seconds.
By typing directly
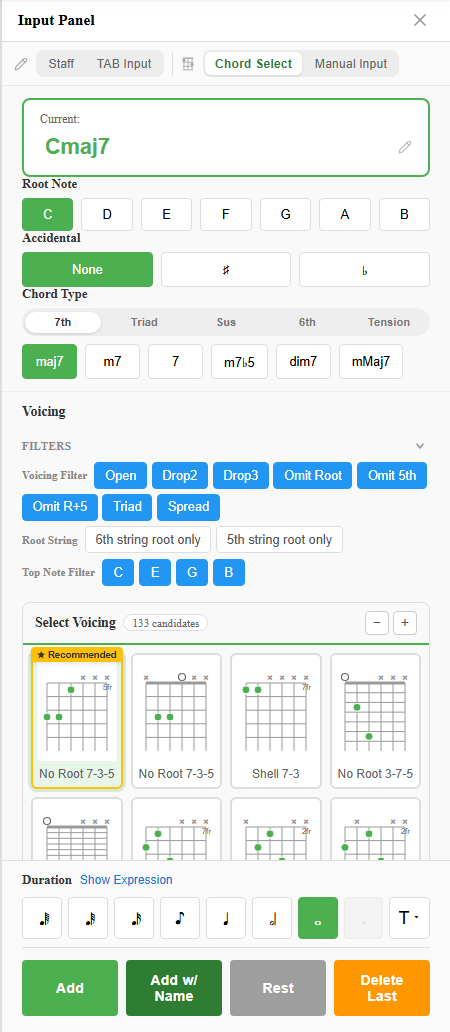
The ”Current:” field at the top (the large green text) is a text input. Just type a name like Cmaj7 and press Enter — the root, accidental, and type sync automatically.
It’s forgiving about notation, too:
♯♭(Unicode) or plain#bboth work- Parenthesized forms like
m7(b5)are parsed as-is (→ m7♭5) - Jazz notation like
Δ7orø7is accepted
If you know your chord names, typing is often faster than the buttons.
2. Narrow the voicings (filters)
Once you’ve chosen a chord, candidate fingerings appear in the ”Voicing” area below. When there are too many, use the filters at the top to narrow them.
- Voicing Filter: narrow by fingering type.
Open/Drop2/Drop3/Omit Root/Omit 5th/Omit R+5/Triad/Spread- Some are unlocked on the Pro plan (shown with a locked “PRO” badge).
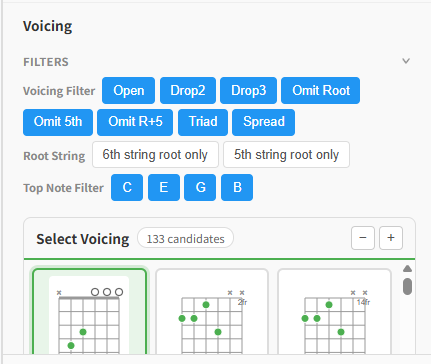
- Root String:
6th string root only/5th string root only— filter by which string holds the lowest note. - Top Note Filter: buttons for the highest note present in the candidates. Handy when you want to pin the top voice to a melody.
The chevron button next to the Filters heading switches to a compact view with abbreviated labels. The state is remembered next time.
Curious what Drop 2, Drop 3, and the omit shapes are? See Drop 2 voicings, Drop 3 voicings, and omitting chord tones.
3. Pick from the candidates
After filtering, tap the fingering you want from the voicing candidates.
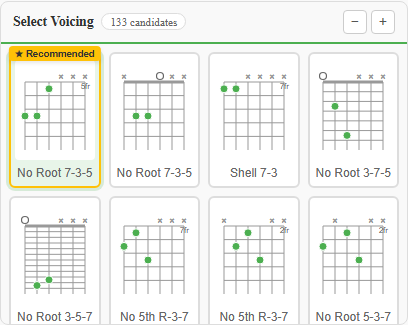
- Each candidate shows its voicing type and fret positions.
- The candidate that connects smoothly to the surrounding chords (smooth voice leading) gets a ”Recommended” mark. When in doubt, that’s the safe pick.
- When there are many, ”Show more” reveals the rest.
- If you over-filter and nothing is left, you’ll see “No voicing candidates available” — loosen the filters.
The fingering you choose is rendered in proper notation on both the staff and the TAB.
4. Add it to the sheet
Finally, write it to the cursor position with the action buttons at the bottom.
- Add: adds the chosen voicing to the sheet.
- Add w/ Name: adds it with the chord name shown above the notes — for a lead-sheet look.
- Delete Last: undoes the chord you just added.
- To Rest: turns that position into a rest.
Tap a chord you’ve already placed to enter edit mode, and the buttons change to ”Update” and ”Delete” so you can swap the fingering or chord type after the fact.
Summary
Chord Select mode is just three steps:
- Choose the chord (Root → Accidental → Type, or type it directly)
- Filter and pick a candidate (when unsure, take “Recommended”)
- Add it to the sheet
Even without knowing the fingering, your chart comes together by picking from theory-based candidates. Try it at notave.zelva.dev with any progression you like.
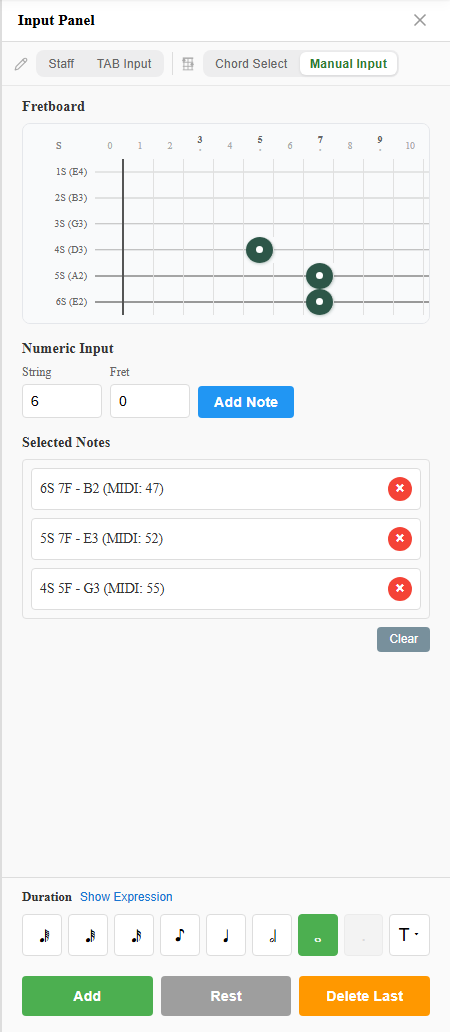
To pin down an exact fingering yourself, see Manual Input mode; for the big picture across modes, see the four input modes.